Craig Safety - Compliance Safety Manager™ - Administrative Program
In Craig Safety - Compliance Safety Manager™, the Administrative Program allows the admin of the system to determine: Users; Their roles and accessibility; Locations of the organization; Requirements for paperwork; Configure the system and, Run reports.
After logging into Craig Safety - Compliance Safety Manager™, the user will see the opening page which displays system wide alerts.
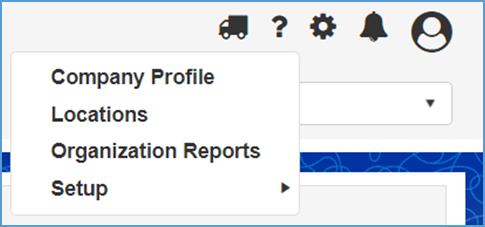
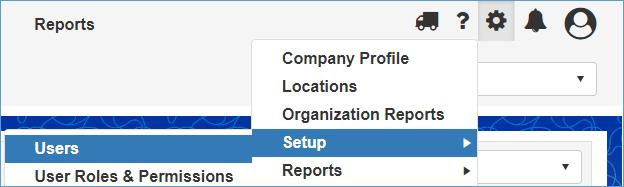
The Administration Program can be accessed from the Home Page → Settings.
Place your cursor over Settings Icon (located in the top right hand corner) and the drop down menu will appear.
Settings Icon

Administration: Company Profile
Step 1: To access your company profile, hover your cursor over the Settings button in the top right hand corner of the home screen.
Step 2: From the dropdown list, select the tab labeled Company Profile.

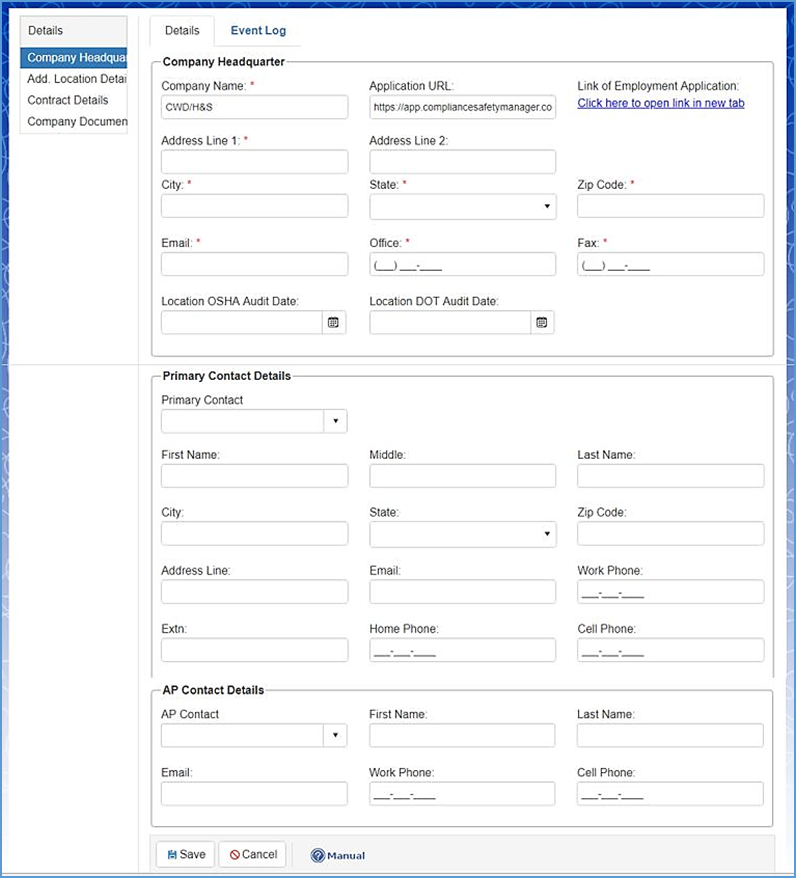
The Company Headquarter screen shows detailed information of the Headquarter for the location you are currently viewing.
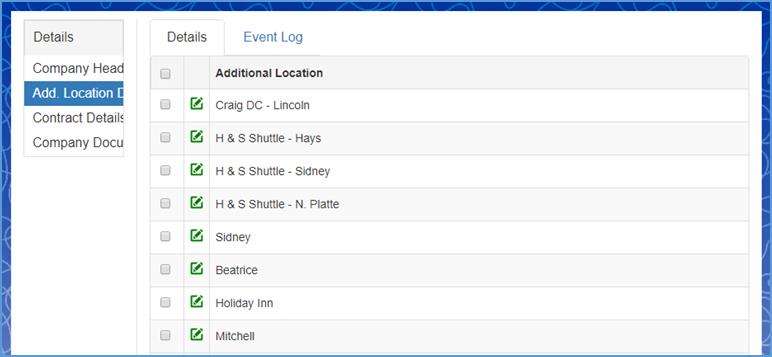
The Add. Location Details screen displays a list of all locations (children, grandchildren, etc.) under the Headquarter area you are currently viewing.
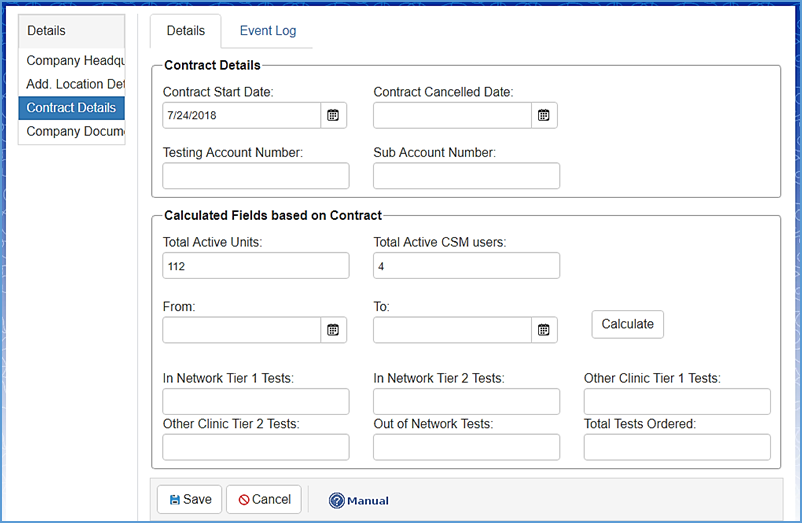
The Contract Details screen displays all information entered by the user which pertains to the current contract in place as well as active units and users.
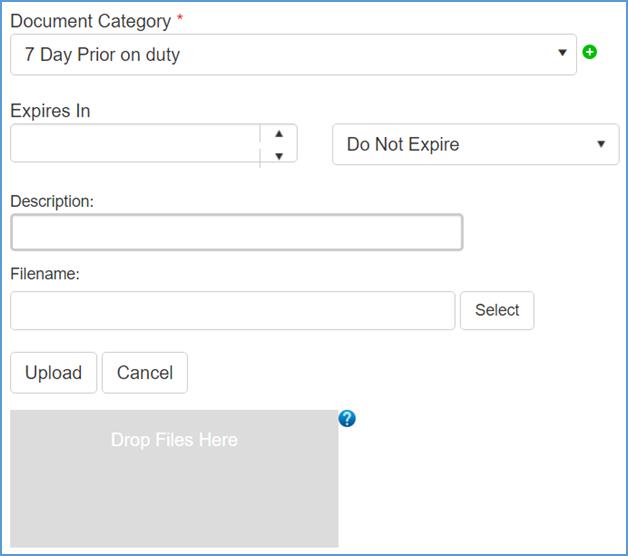
The Company Documents tab allows you to add or upload a company’s document (e.g. Employee Handbook, Processes and Procedures, Contracts, etc.)
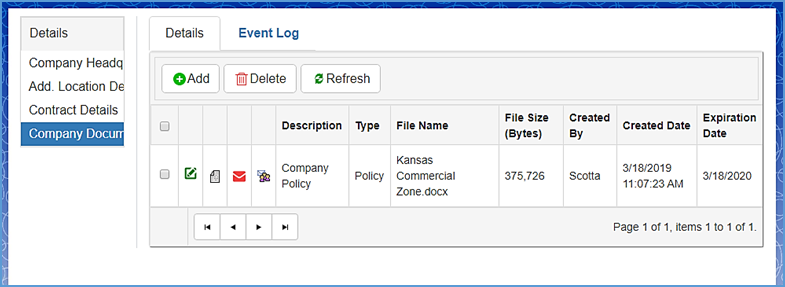
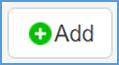
Step 1: To add a document, click the Add button located on the top left hand of your screen.
Step 2: Fill out the required fields, marked by a red asterisk (*), and click the Upload button when complete.
Administration: Locations
Under Settings, click the tab labeled Locations.
This will display the Locations in a hierarchical tree format and records will be listed in alphabetical order. The short name assigned to the location will also be listed.
Step 1: To add a Location, first select the location you wish to add a child location to and then click the Add Location button marked by a green plus sign.
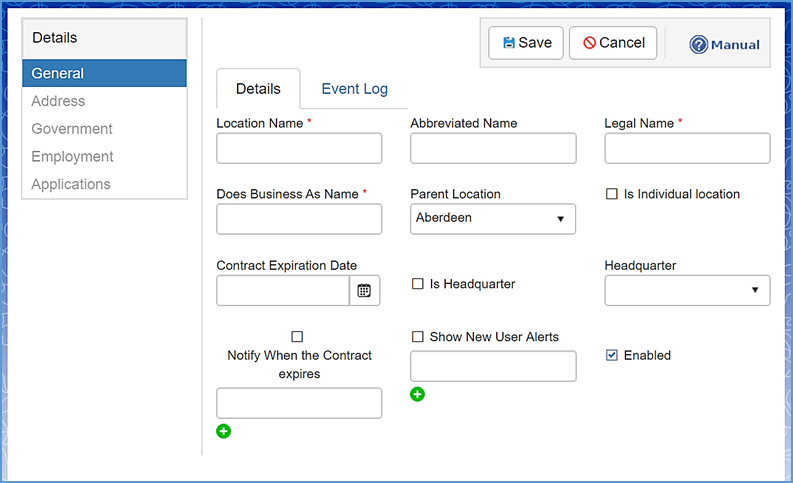
Note: This page allows the User to enter specific details of a new Location.
Step 2: Enter the following: Location Name; Abbreviated Name (if applicable); Legal Name; Does Business As Name; Parent Location; and, Contract Expiration Date.
Note: The ‘Is Individual location’ checkbox is for setting up an entirely new organization with no ties to your current location, it will require its own set of rules and reports completely independent from users and configurations of your current setup. REACH OUT TO Craig Safety - Compliance Safety Manager BEFORE USING THIS OPTION
Step 3: If the new location is a headquarter, click the box labeled Is Headquarter. If it is not, navigate to the Headquarter drop down located on the right-hand side of the page and select the correct headquarter location.
Note: child locations of a headquarter adopt the configuration of that headquarter. Typically only one Headquarter is needed.
(optional) Step 4: Navigate to the fields labeled Notify When the Contract expires and Show New User Alerts and click the check boxes. Enter the email ID’s of individuals whom email alerts will be sent to.

Step 5: Click the check box next to the field labeled Enabled if you wish to actively utilize this location.
Step 6: Save the changes by clicking on the Save icon located in the upper left-hand corner of the screen.
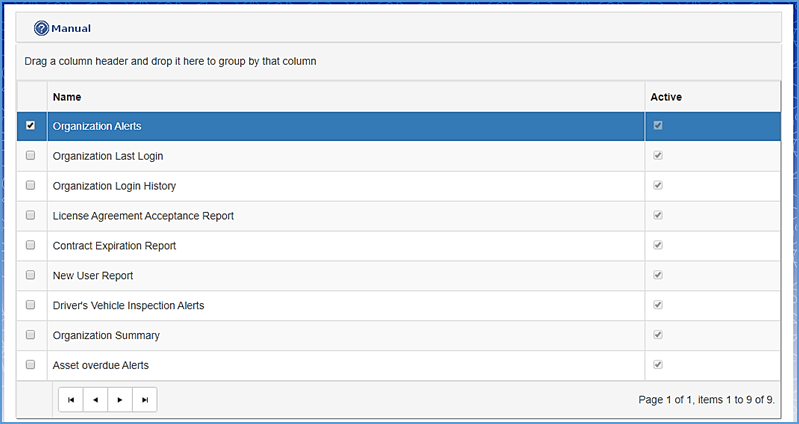
Administration: Organization Reports
To run system level reports, hover your cursor over the Settings icon displayed on the top right hand side of the computer screen, and then click on Organization Reports.
On the Organization Reports screen, the User can select the specific report they wish to view. These are overall organization reports for the entire organization and display user habits, system wide alerts and other important information for administrators of CSM.
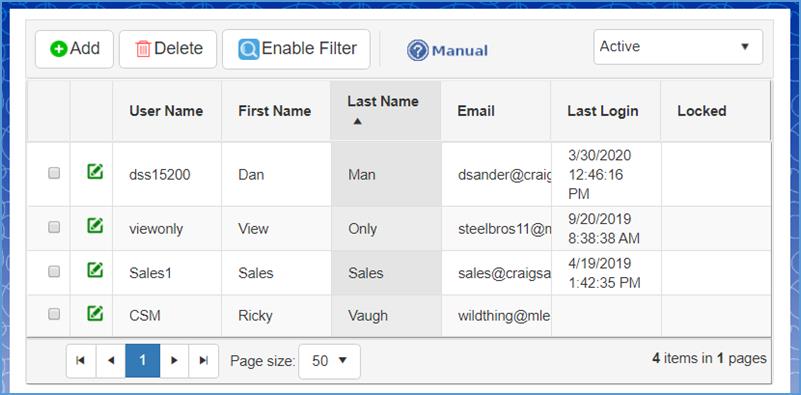
Administration: Users
Under Users in the system, you have the ability to add new users, set organization access, and set alert notifications.
Step 1: From the Settings menu, hover your cursor over the Setup tab and select Users from the dropdown list.
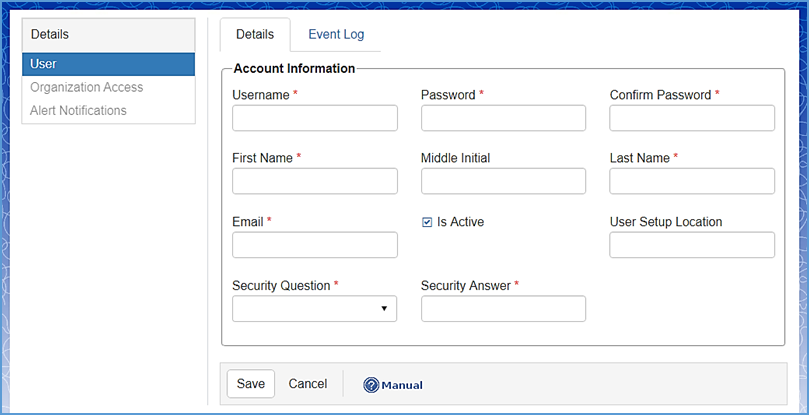
Step 2: To add a new user to the system, click the Add button in the upper left hand corner of the screen.
Step 3: Under Account Information, fill out the required fields. These are marked by a red asterisk (*).
Administration: Users - Organization Access
The Details tab on the left hand side of the page lists the following for a specific user: User, Organization Access and Alert Notifications.
The Organization Access tab allow you to assign the specified user to one or more child locations and determine their role under those location(s).
Note: Users given permission to a location will automatically have permission to access all child locations that exist underneath that location.
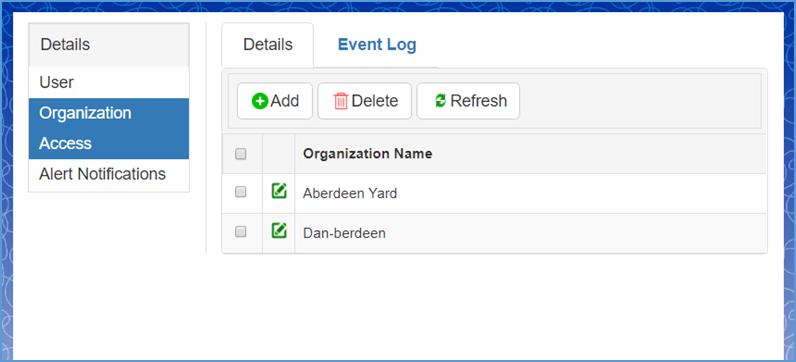
To create a new organization/role for a specific use, click the Add button located under the Details tab.
To modify an existing organization/role, click the Edit icon located on the left hand side of the organization(s) name.

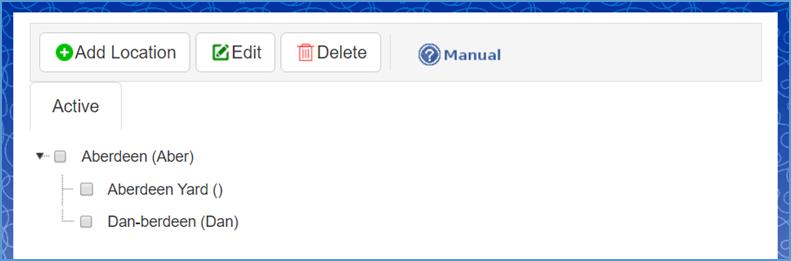
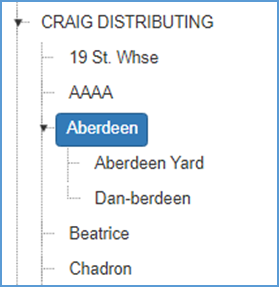
Whichever location(s) the User is assigned to will automatically give the specified user the same access controls as the children organization(s) and/or location(s). Refer to the following screen shot. Assigning access to Aberdeen’s location will also give the user access to Aberdeen Yard and Dan-berdeen locations.
Note: Default permission of selection location will be updated by selected location permission/roles.
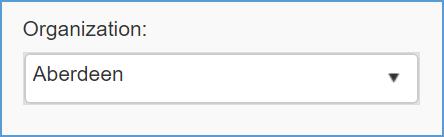
When adding and/or editing a specific organization/role, refer to the following steps.
Step 1: Navigate to the field labeled Organization, and select the organization you want to apply to the user.
Step 2: Navigate to the next section labeled Select the Role(s) for the user in this organization and select the preferred checkbox.
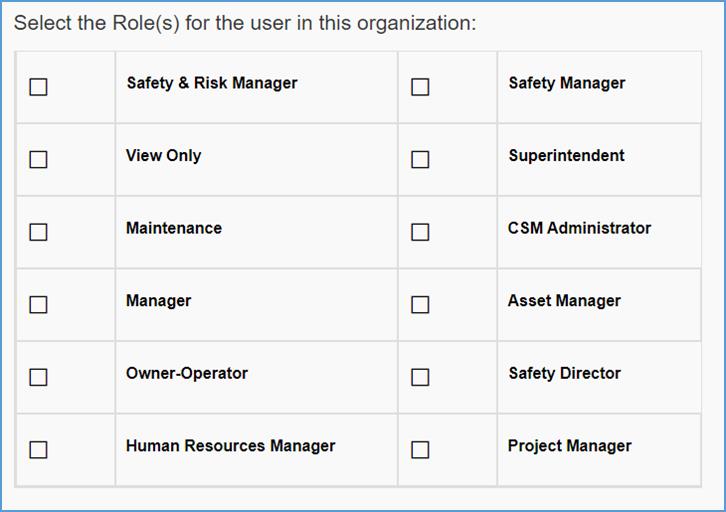
Step 3: If you’re updating an organization/role, click the Update button to save your changes. If you’re adding a new organization/role, insert the required information and click the Save button.

Administration: Users - Alert Notifications
The Alert Notifications page designates: Organization to receive alerts on, the type of alert(s) you want to receive, and the day(s) you wish to receive email alerts.
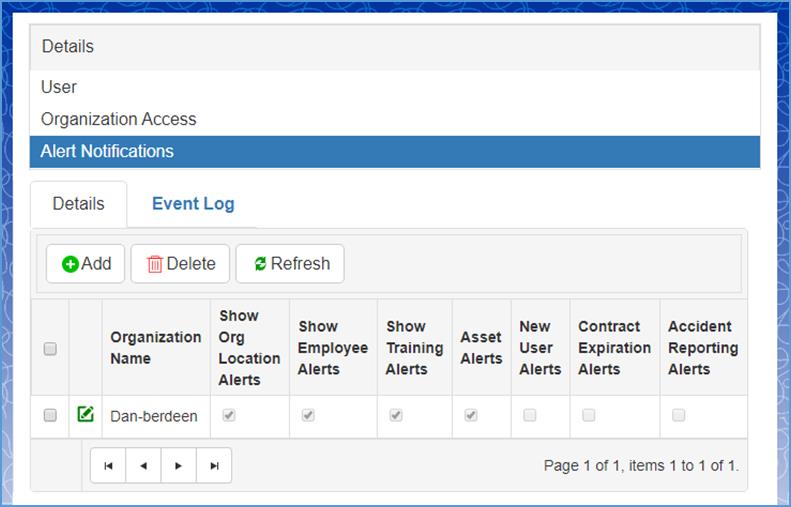
Step 1: To create an alert notification, click the Add button located under the Details tab. The following screen will appear.
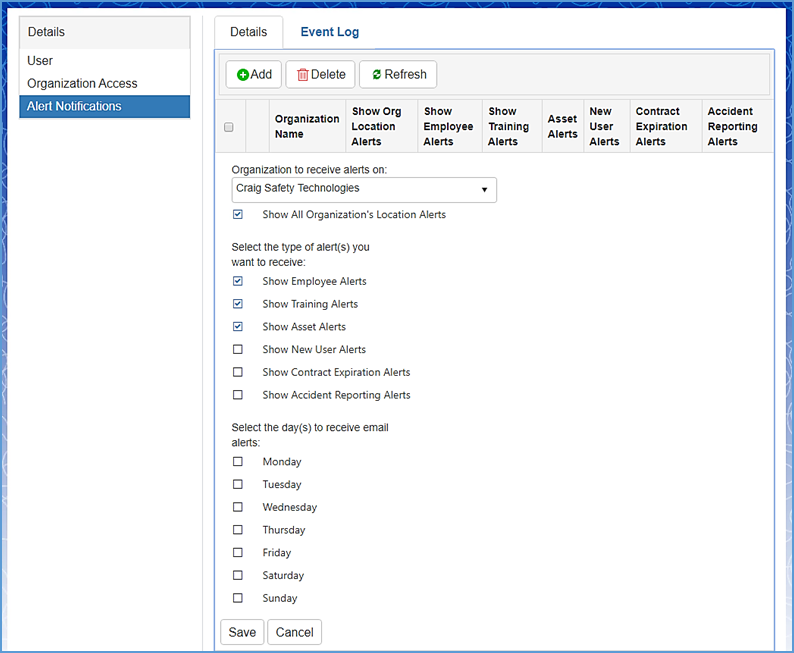
Step 2: Select the following options you want to receive alerts through or on and click the Save button when complete.
Administration: User Roles and Permissions
User Roles & Permissions are controls on what permissions you give different users in the system (e.g. areas they can see, save, edit, access reports, etc.).
Note: Roles are preset permissions. When you assign a user role, the permissions and rules will apply automatically. You can create new Roles, or edit names of existing Roles and configure their permissions.
Step 1: To assign different security roles, access, and position titles for users, select User Roles & Permissions for the dropdown menu under Settings.
Home Screen → Settings → Setup → User Roles & Permissions

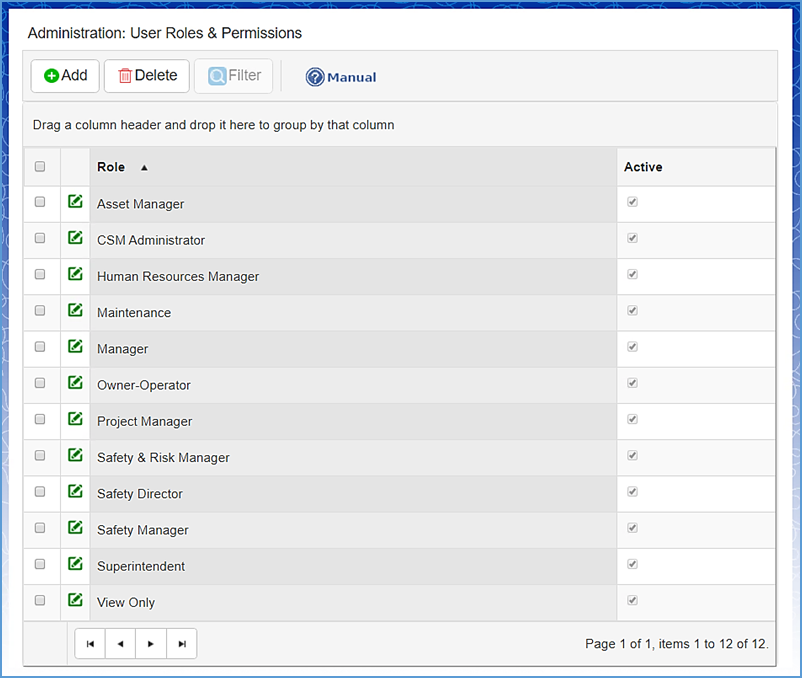
Step 2: Double-click the Role you want to fine-tune permissions for or rename. Let’s use Human Resources Manager as an example. (Refer to the following screenshot)
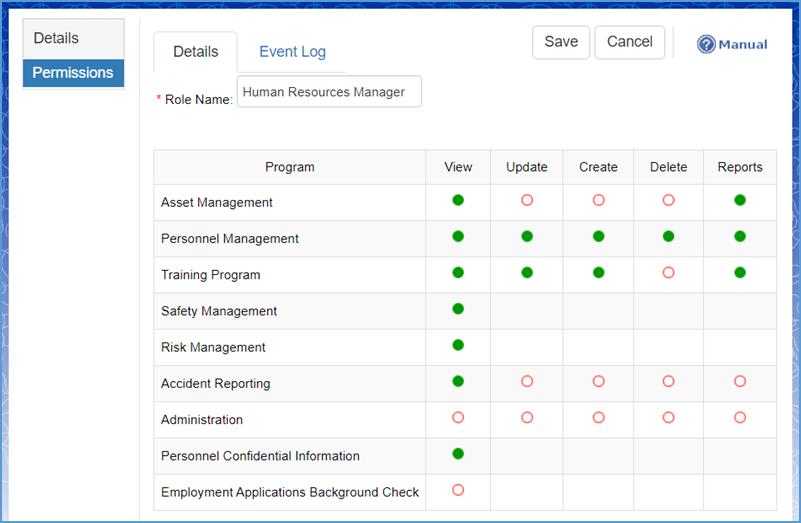
Note: The green circles are preset permissions based on the role selected for the user.
Step 3: Select/deselect permissions to adjust that Role (if applicable) and click the Save button in the upper right hand corner of the screen.
Administration: Drop-Down Lists
Maintenance Items allows the user to setup different categories throughout the system that pertain to drop-down lists.
To access Drop-Down Lists, go to: Settings → Setup → Configure → Drop-Down Lists.
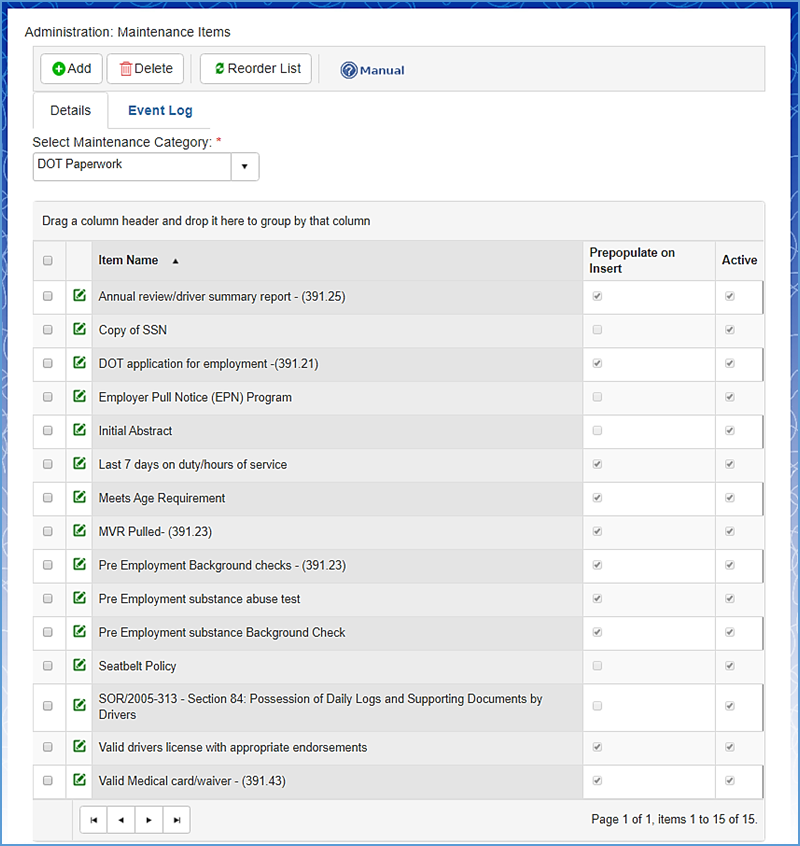
Step 1: Navigate to the first field labeled Select Maintenance Category and choose the section you want to customize. (DOT Paperwork will be used as an example)
Note: Maintenance Category pertains to customizing each section of the system and deeming it an active or inactive category.
Step 2: Select the maintenance item you want to change. You can do this by clicking the Edit icon on the left hand side of each item or simply double-click the specified category.
The following screen will appear:
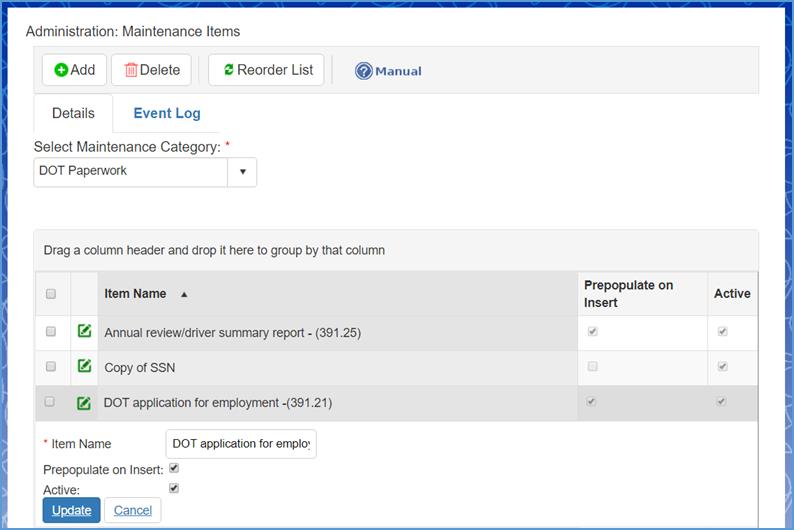
Step 3: Select the controls you want to set for the specified category. Once complete, click the Update button.
To add a new item to your selected Drop-Down list, click the Add button in the left hand corner of the system screen.
Fill out the required fields, marked by red asterisks (*) and click the Save button when complete. (Refer to the following screenshot)
Administration: Violations
All active violations are populated in Road Side Inspection → Select Violation(s) Drop-Down List (also referred to as a Picklist).
Step 1: To add a new section, click the Add button in the left hand corner of the system screen.
Refer to the following screen:
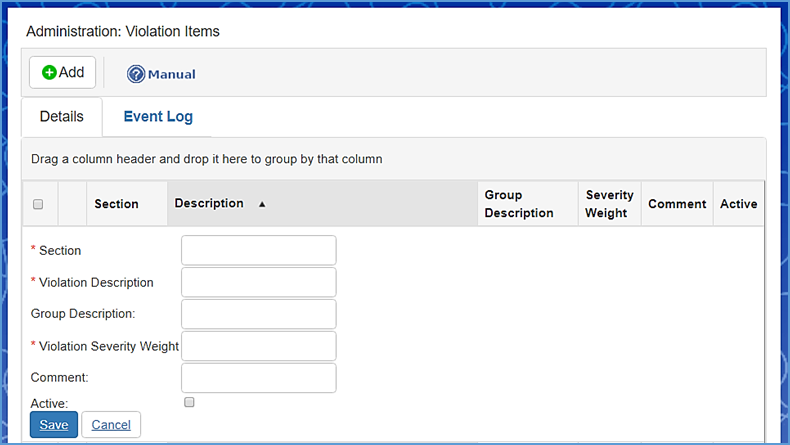
Note: Required Fields include the Section, Violation Description, and Violation Severity Weight.
Step 2: Fill out the required fields marked by red asterisks (*). Click the Active checkbox if you want the new section to be added in the system. Click the Save button when complete.
To update an existing section, click the Edit icon on the left hand side of the specified violation.
Click the Update button when complete.
Administration: Categories (Module Configuration)
Under Administration Categories, the user can select which modules are needed for their employees and assets. These modules pertain to the employee type and/or asset type.
For example: If you have an employee whose type is ‘Secretary’, you don’t need the ‘DOT Paperwork’ module applied to them. In Administration Categories, the user can remove the ‘DOT Paperwork’ modules from displaying for all ‘Secretary’ employee types.
By removing module types for a specific employee and/or asset, it will prevent the system alerts associated with it from being generated.
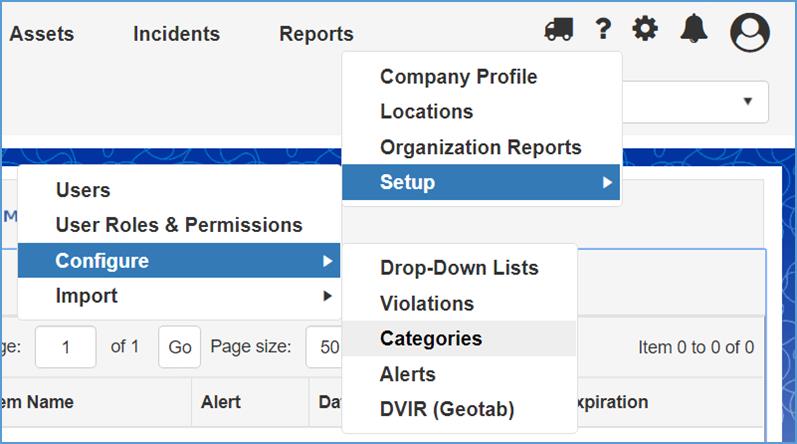
To access Categories, navigate to Settings → Setup → Configure → Categories.
Step 1: Select an Employee Type or Asset Type and click the Edit button to modify the module view. Refer to the following screenshot.
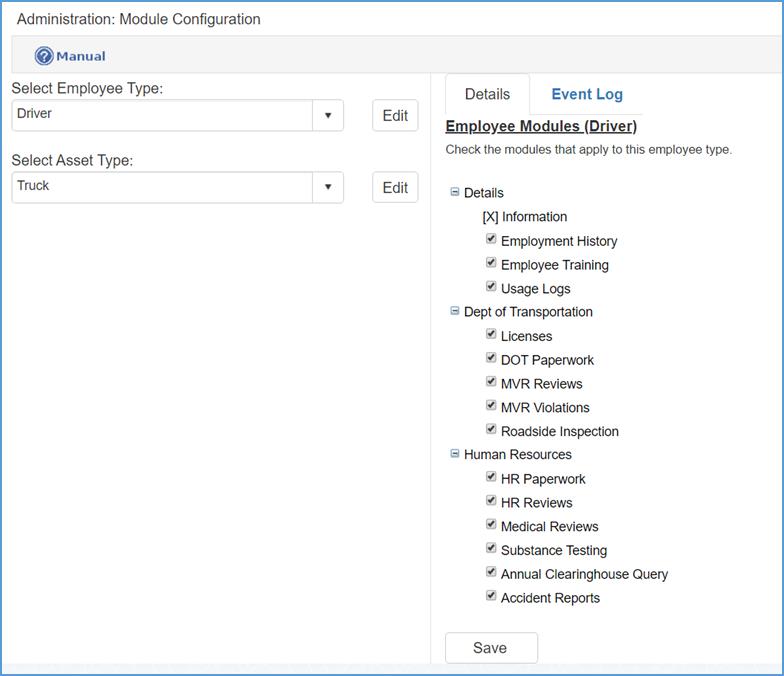
Step 2: By default, modules will automatically be selected by employee/asset type. Check or uncheck the modules you would like to remove and click the Save button when finished.
Administration: DVIR (Geotab)
Craig Safety - Compliance Safety Manager™ connects directly with Geotab’s telematics System (Geotab Drive). In this section, the administrator can set up how Geotab connects with Craig Safety - Compliance Safety Manager™.
The DVIR (Driver Vehicle Inspection Report) section only pertains to customers who use Geotab’s telematics system (GPS tracking system).
Step 1: Navigate to Settings → Setup → Configure → DVIR (Geotab).
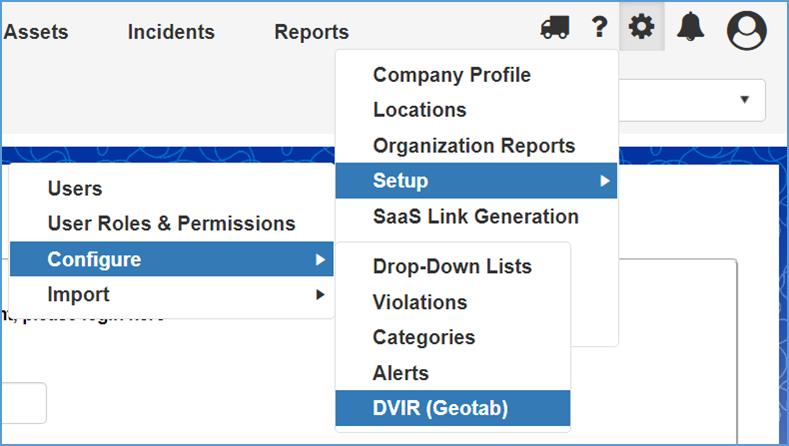
Refer to the following screenshot.
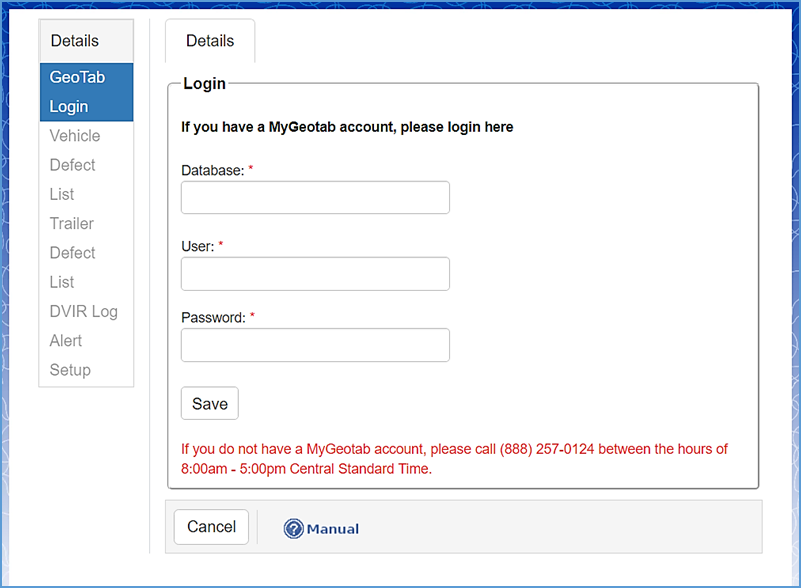
Step 2: The Geotab Login Module allows the user to enter their Database Name, Username and Password for their Geotab login. Fill out the required fields marked by a red asterisk (*) and click the Save button when complete.
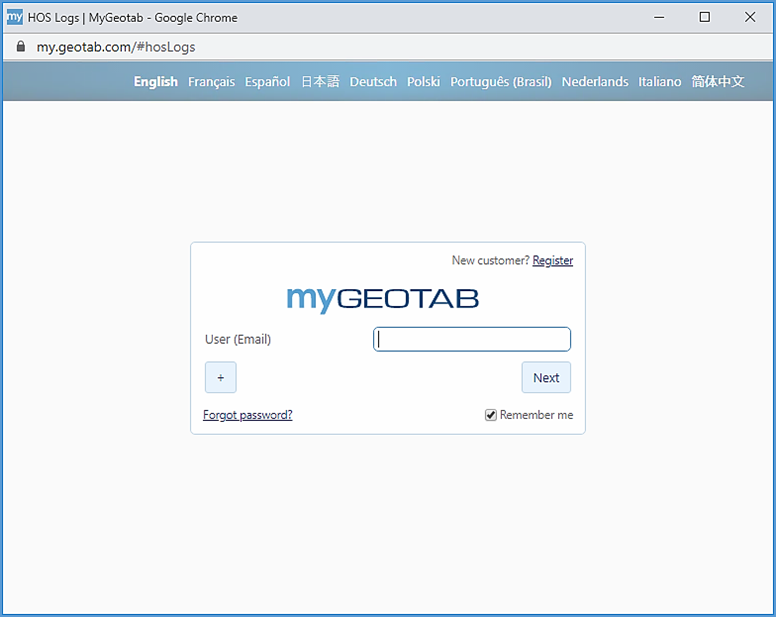
Once you have created a login for Geotab, click the Truck icon located in the top right hand corner of your screen.

This will take you to the Geotab Login screen where the user will enter their credentials. Refer to the following screenshot.
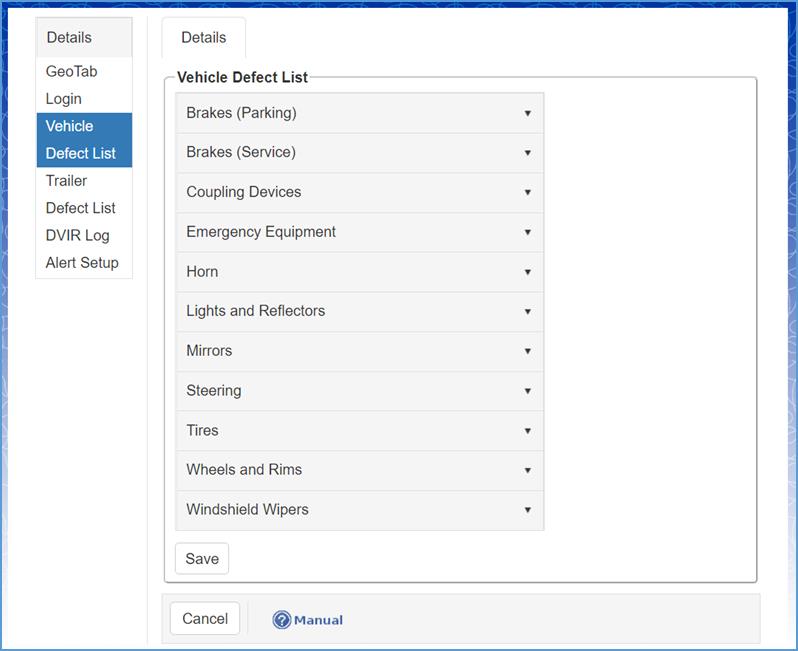
Vehicle Defect List
The Vehicle Defect List module allows the User to set up the severity levels for the vehicle(s).
Step 1: Navigate to the Vehicle Defect List module which is located on the left hand side of the users screen. Refer to the following screenshot.
Craig Safety - Compliance Safety Manager™ is directly connected with Geotab’s system, therefore the data synchronizes between the two platforms. CSM can escalate alerts for inspection findings. The three different levels of alerts are: Informational, Warning and Critical.
Step 2: As an example, we’ll look at Brakes (Parking) which is the first section in the Vehicle Defect List. To set the severity for your vehicle(s), click the Braking (Parking) field.
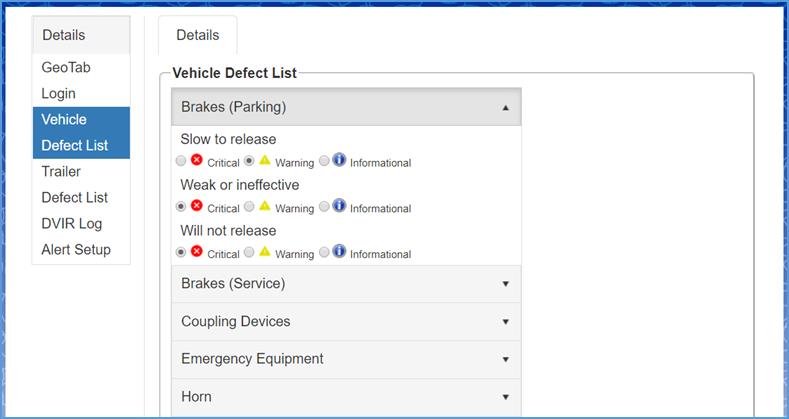
Step 3: Select the severity level you want for each subsection and click the Save button when complete
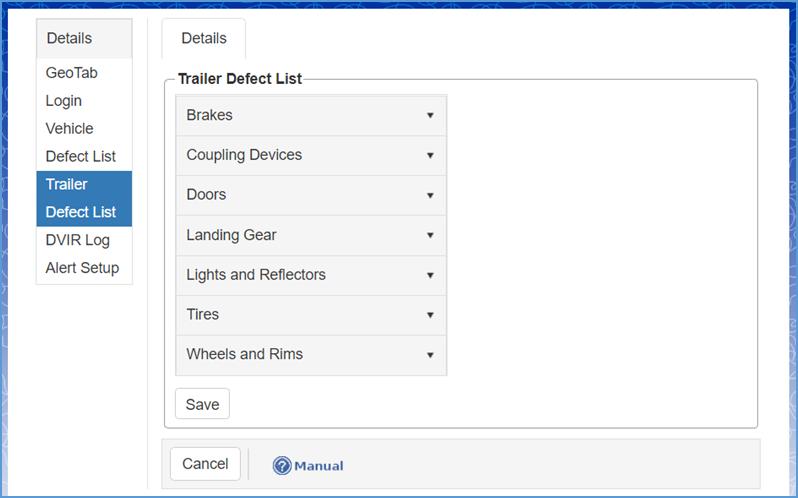
Trailer Defect List
The Trailer Defect List module allows the User to set up the severity levels for the trailer(s) defects found.
Step 1: Navigate to the Trailer Defect List module which is located on the left hand side of the users screen. Refer to the following screenshot.
Step 2: As an example, we’ll look at Brakes which is the first section in the Trailer Defect List. To set the severity for your trailer(s) found defects, click the appropriate section.
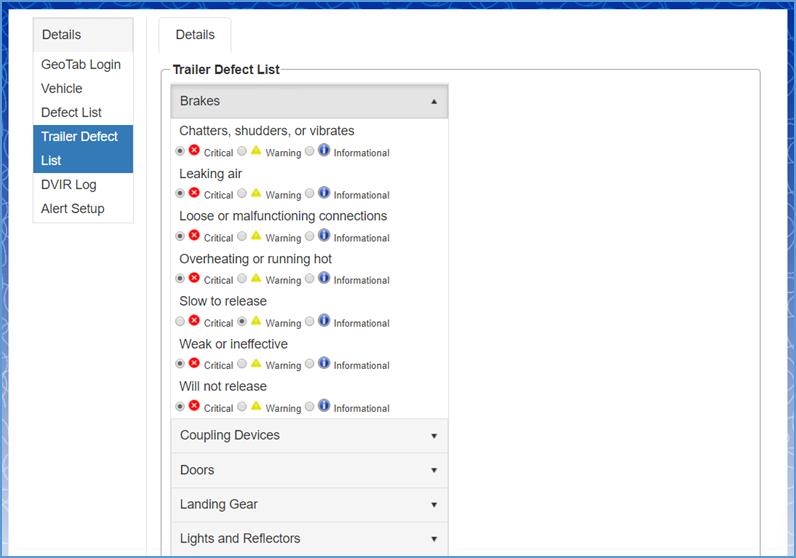
Step 3: Select the severity level you want for each subsection and click the Save button when complete.
DVIR Log
The DVIR Log section ensures that drivers and vehicles are mapped to Craig Safety - Compliance Safety Manager™ correctly. The DVIR Log module tracks pre-inspection(s) and post-inspection(s) through the Geotab Application (Geotab Drive) and synchronizes the given data into the Craig Safety - Compliance Safety Manager™ system.
The DVIR Log module is located on the left hand side of the users screen. Refer to the following screenshot.
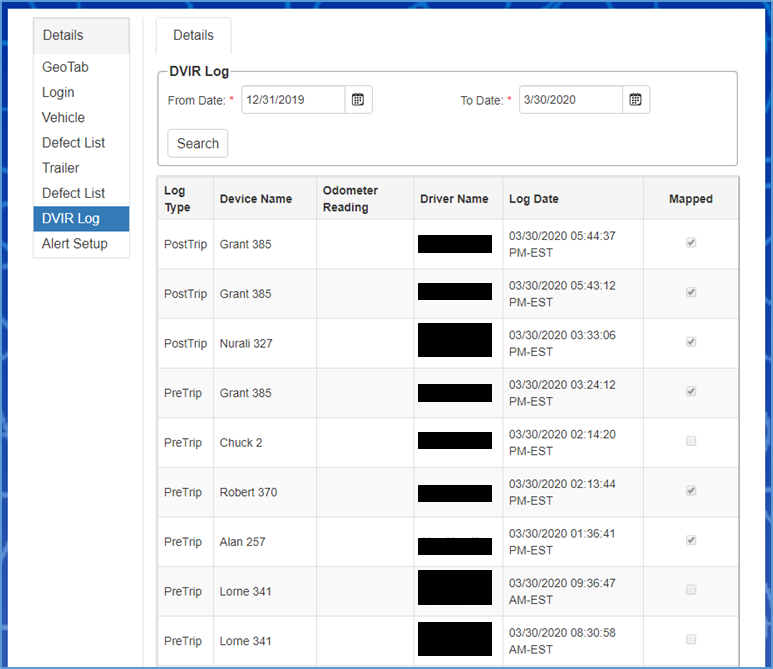
In the DVIR Log module, the user can select a specific timeframe for driver logs they want to view by referring to the From Date and To Date fields. These fields are located at the top of screen and marked by a red asterisk (*).
Users can access the following in the DVIR Log module: Log type; Device Name; Odometer Reading; Driver Name; Log Date; and, Mapped.
A great addition to Craig Safety - Compliance Safety Manager™ and Geotab working together through DVIR’s is that the assets odometer readings are consistently tracked within the system.
DVIR Alert Setup
The Alert Setup module allows administrators to select individuals which will be alerted when a defect comes through a driver(s) pre or post trip inspection.
Step 1: Navigate to the Alert Setup module on the left hand side of the screen. Refer to the following screenshot.
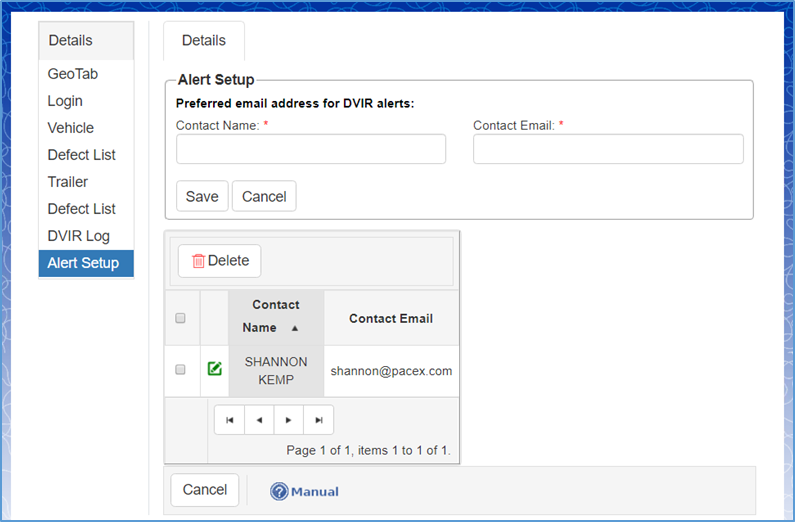
Step 2: To add Alert Setups for an administrator, fill in the Contact Name and Contact Email fields marked by a red asterisk (*).
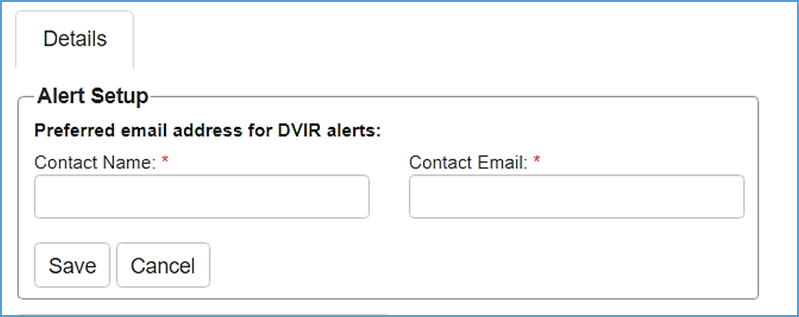
Step 3: Click the Save button when complete.
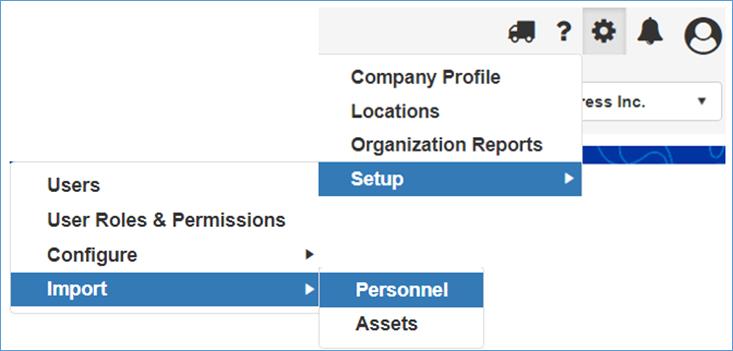
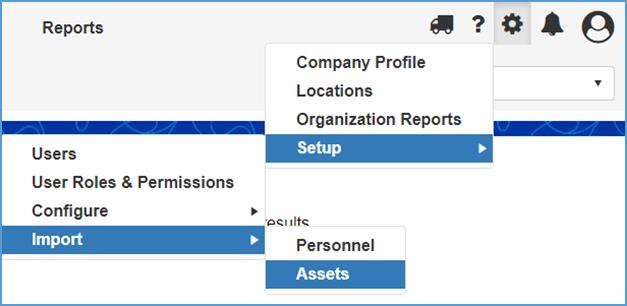
Administration: Import (Personnel)
Prerequisites and Notes:
- You must have Microsoft Excel 2007 or newer to perform this process.
- Do not attempt to reorder the columns or insert additional columns in your spreadsheet. This may cause undesirable results.
Navigate to Settings → Setup → Import → Personnel. Refer to the following screenshot.
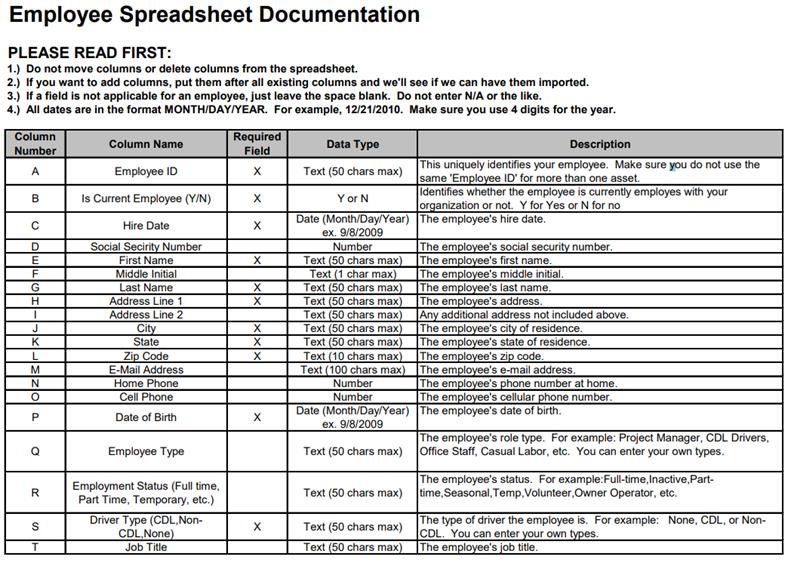
Step 1: Download the employee spreadsheet template [CSM_Import_Employees.xlsx]. The link can be found under the Instructions section and is marked in blue lettering.

Review the PLEASE READ FIRST section at the top of the Employee Spreadsheet Documentation tab.
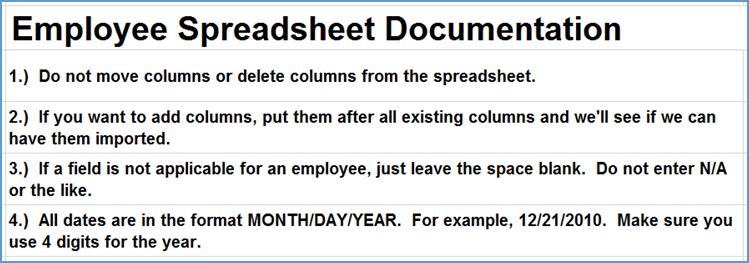
The Employee Spreadsheet Documentation tab is guidance on how to: Fill out the spreadsheet What each column in the spreadsheet is used for; What format the data needs to be in; and, Character limits for each cell in that column. Refer to the following screenshot.
Note: This is from the guidance tab on the downloaded spreadsheet
Step 2: Locate the second tab labeled Spreadsheet to Import and fill in the spreadsheet with the appropriate data.
Note: Use the Documentation spreadsheet (shown above) for guidance.
Step 3: Return back to the webpage and chose the organization you want to import employees for in the Select Organization field.
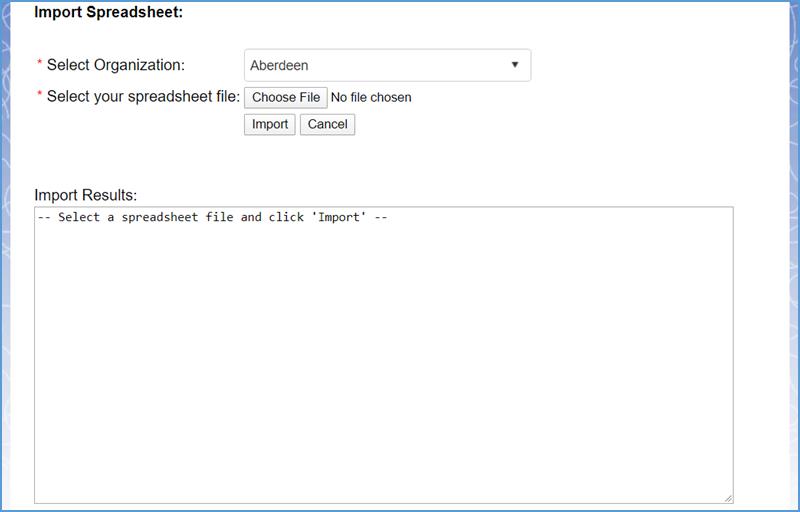
Step 4: Navigate to the ‘Select your spreadsheet file’ field and click the Choose File button to upload your worksheet.
Step 5: Click the Import button when complete.
Note: If there are any errors associated with the data, nothing will be imported and the user will be notified of the specific inaccuracies.
Administration: Import (Assets)
Prerequisites and Notes:
Navigate to Settings → Setup → Import → Assets. Refer to the following screenshot.
Step 1: Download the asset spreadsheet template [CSM_Import_Assets.xlsx]. The link can be found under the Instructions section and is marked in blue lettering.

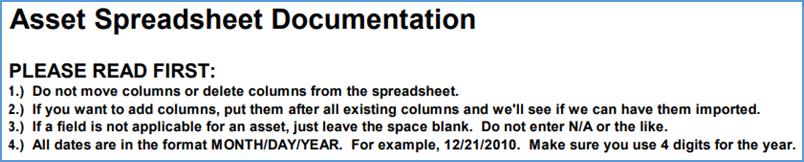
Review the PLEASE READ FIRST section at the top of the Asset Spreadsheet Documentation tab.
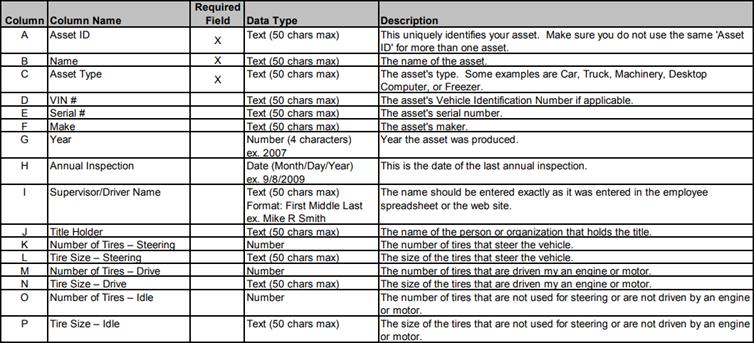
The Asset Spreadsheet Documentation tab is guidance on how to: Fill out the spreadsheet; What each column in the spreadsheet is used for; What format the data needs to be in; and, Character limits for each cell in that column. Refer to the following screenshot.
Note: This is from the guidance tab on the downloaded spreadsheet
Step 2: Locate the second tab labeled Spreadsheet to Import and fill in the spreadsheet with the appropriate data.
Note: Use the Documentation spreadsheet (shown above) for guidance.
Step 3: Return back to the webpage and chose the organization you want to import employees for in the Select Organization field.
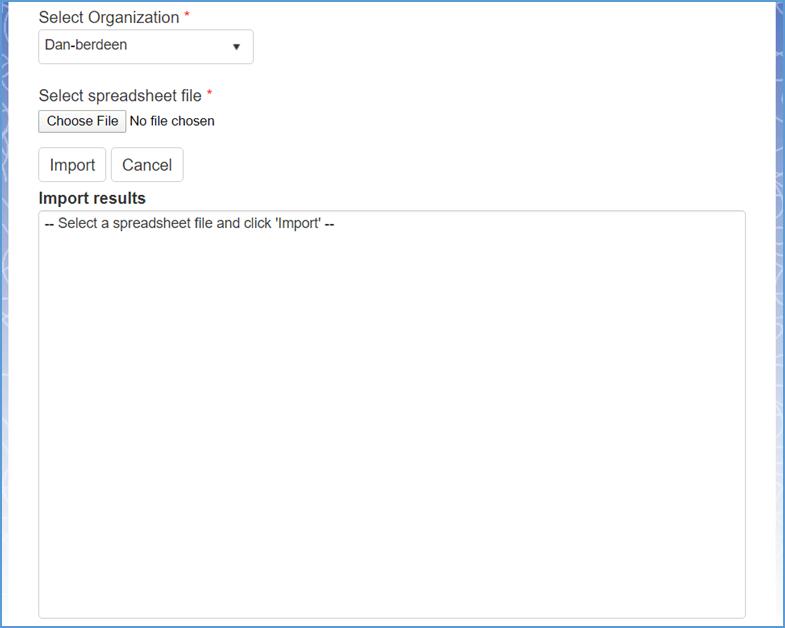
Step 4: Navigate to the ‘Select your spreadsheet file’ field and click the Choose File button to upload your worksheet.

Step 5: Click the Import button when complete.
Note: If there are any errors associated with the data, nothing will be imported and the user will be notified of the specific inaccuracies.