Craig Safety - Compliance Safety Manager™ - Personnel Management Program
The Personnel Management Program offers the following: Tracks employee demographics; Manages driver qualification files; Schedules training requirements (by employee type); Alerts upcoming and missing training; and, Tracks all notes and documents.
To access this program, click the tab labeled Personnel which can be found at the top-center of your screen. Refer to the following screenshot.

Once you’ve clicked on the Personnel tab and the home page has loaded, you will see a list of all personnel and accompanying information within your company.
Specifically, the Personnel Management: Home Page will display the personnel’s specific information including: Alerts; Employee ID; Location; First Name; Last Name; Employee Type; and, Job Title.
New Employee
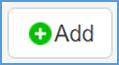
Step 1: To add a new employee, click the Add button located on the top left-hand side of your screen. (Marked by a green plus sign).
Refer to the following screenshot.
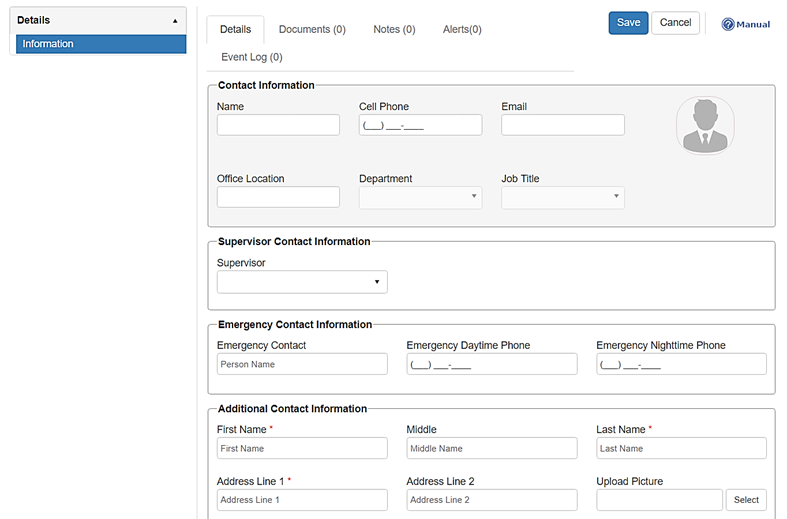
Step 2: Fill out the required fields which are marked with a red asterisks (*).
A new feature that has been added to Craig Safety - Compliance Safety Manager™ is the Upload Picture field.
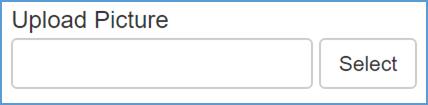
To upload a picture for an employee or asset, click on the Select button and choose the specific picture from your files.
Step 3: When complete, navigate to the Save button located in the top right-hand corner of the Details screen.

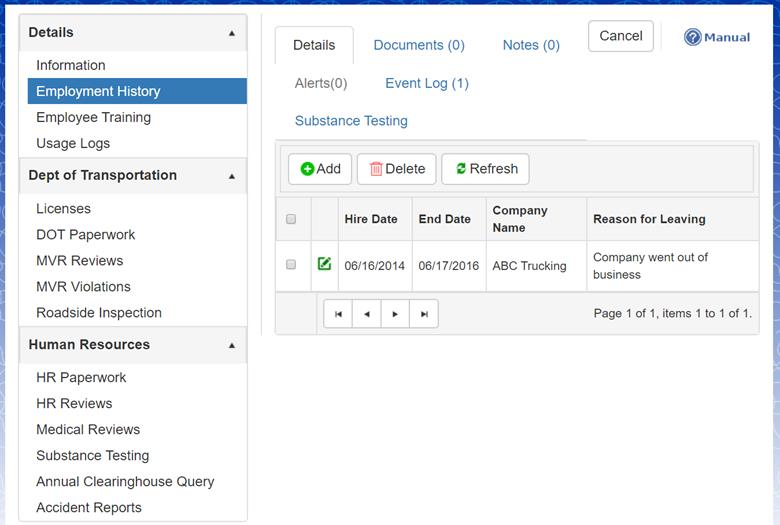
Personnel Management: Details – Employment History
The Employment History section allows you to track the start and end date of a specific employees previous employment.
Note: this information will automatically fill out if employee used the Employment Application feature.
Refer to the following screenshot.
Step 1: Click the Add button which is indicated by a green plus sign.
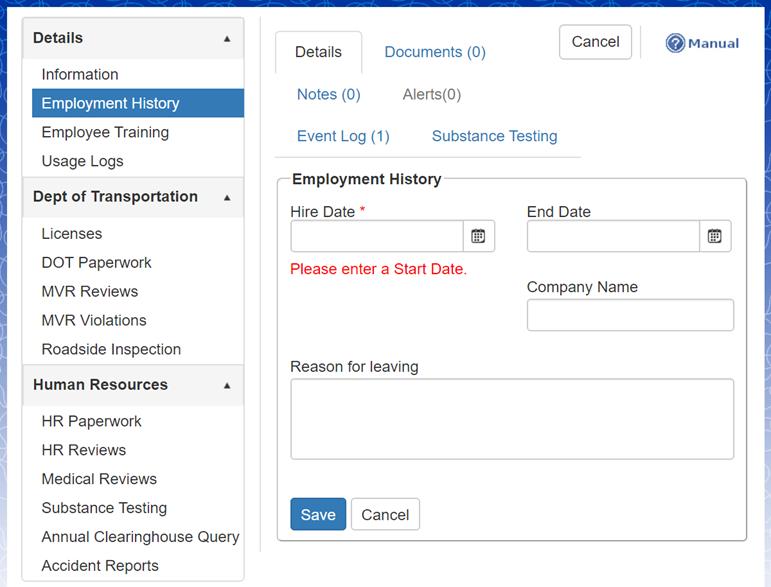
Step 2: File out the required fields marked by a red asterisks (*).
Step 3: When complete, click the Save button.
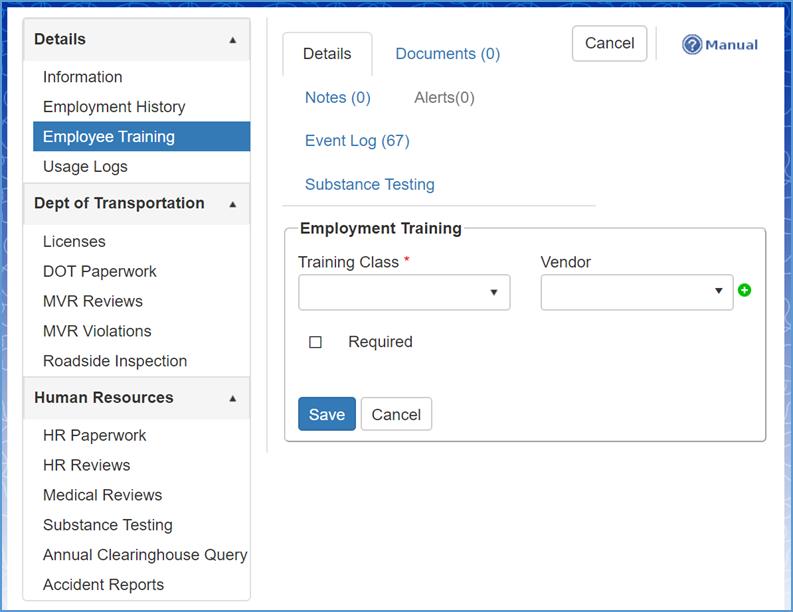
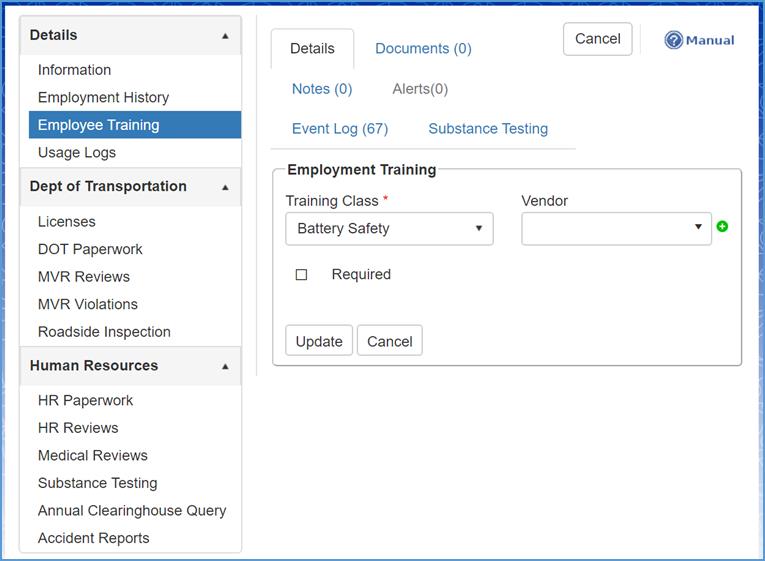
Personnel Management: Details – Employee Training
The next module under a specific employee is Employee Training. Under the Employee Training section, the user can select specific classes (that were set up in the Training Program) for an individual.
The user can also: Schedule training (for existing classes in the Training Program); View Alerts (for that specific employee); Run reports on training completed; View upcoming training; and, observe any training missed.
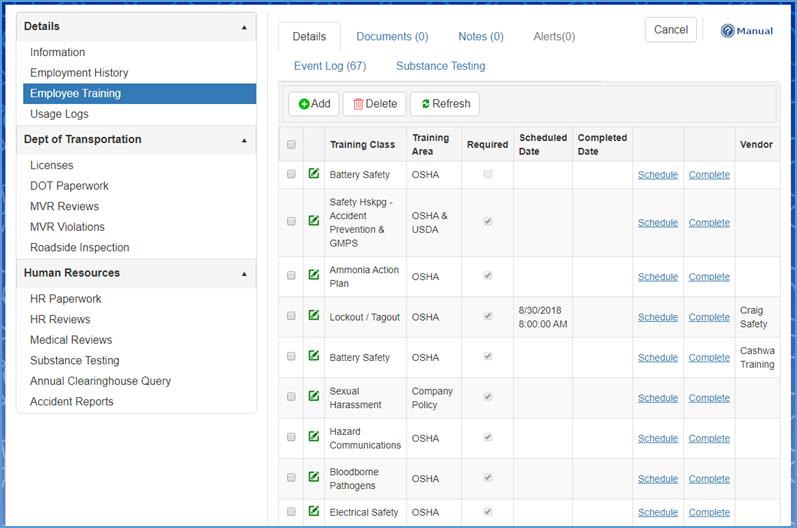
The Employee Training page shows: The specified Training Classes; The Training Area (the area that the training class falls under); If the class is Required; The Scheduled Date; The Completed Date; and, Gives the user the option to Schedule a training class or select the date a class was Completed.
Step 1: To add a new training class for a specific individual, click the Add button which is marked by a green plus sign.
The following screen will appear.
Step 2: Navigate to the Training Class field marked by a red asterisks (*) and select the specified class from the drop-down.
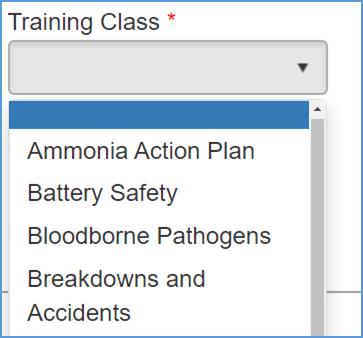
Step 3: Select the Vendor (if applicable) and note if the training class is Required for the employee.
Once the training class has been saved, the user will be able to Schedule a training date.
Step 4: Click on the field labeled Schedule in blue font and underlined. Refer to the following screenshot.
Step 5: Navigate to the Available Dates field, and select the specific date you want to schedule the training class for the individual.
Note: Available Dates will only appear once scheduled in Training Program.
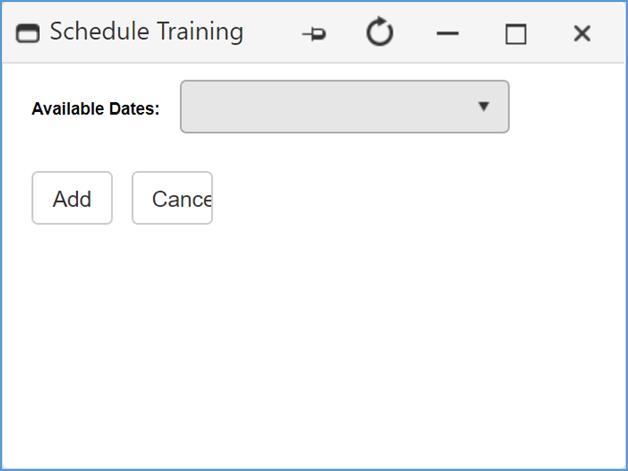
Step 6: Click the Add button when complete.
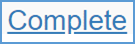
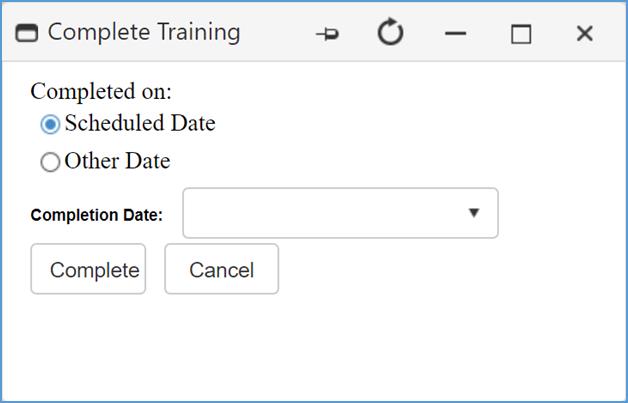
Step 7: To denote that the training class has been completed by an individual, click on the Completed link that corresponds with that specific class.
Step 8: Select the Completion Date from the drop-down menu (Note: Dates will only be available if they were scheduled in the Training Program). The Complete Training screen gives you the option to select if the class was completed during the scheduled date or a different date.
Note: These changes will be reflected in the class list.
To edit an established Training Class, select the Edit icon located on the left-hand side of the specified training class. Refer to the screenshot below.

Implement the changes you want and click the Update button when complete.
Personnel Management: Details – Usage Logs
To add a new Usage Log record, navigate to the Usage Logs tab on the left-hand side of your screen.
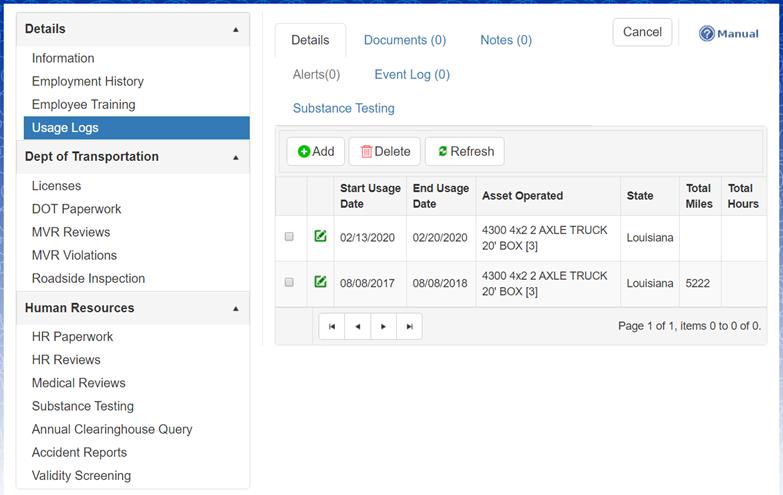
Step 1: Click the Add button which is marked by a green plus sign.
The following page will display after clicking the Add button.
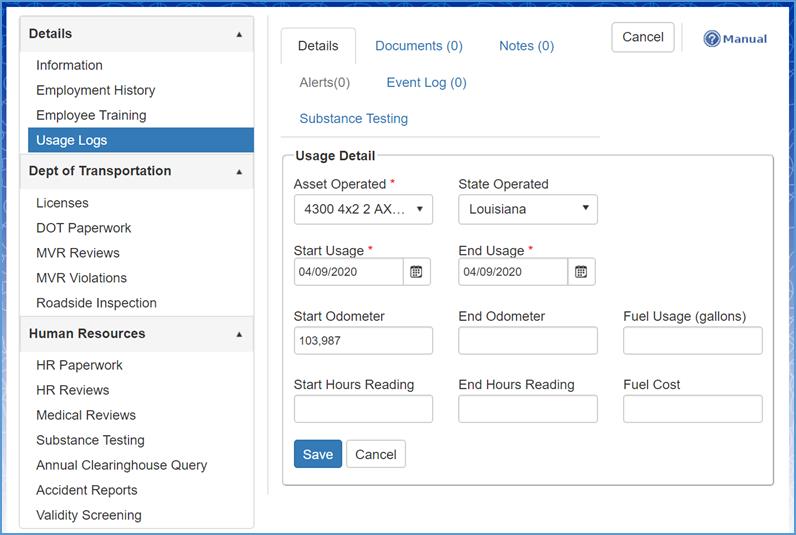
Step 2: Fill out the required fields which are characterized by a red asterisks (*). The required fields include Asset Operated, Start Usage and End Usage.
Step 3: Click the Save button when complete.
Personnel Management: Dept. of Transportation – Licenses
The Licenses module allows users to input information which pertains to the: Expiration Date; License Type; State Issued; License Number; Endorsement(s); If license is Suspended; and turn Alert On/Off.
To add a new license, refer to the following steps.
Step 1: Click on the Add button displayed by a green plus sign.
Step 2: Fill in the required fields marked by a red asterisks (*). Refer to the following screenshot.
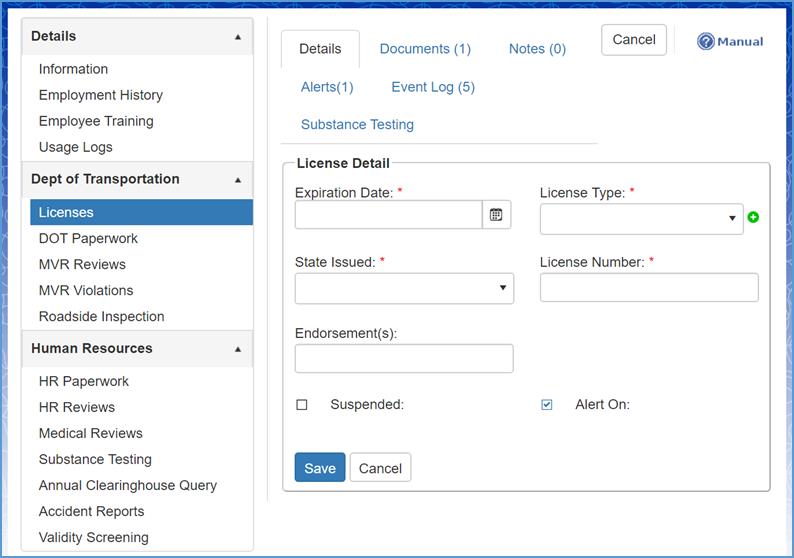
Step 3: Click the Save button when complete.
To edit or change existing information, click the Edit icon which can be found on the far left-hand side of the grid.
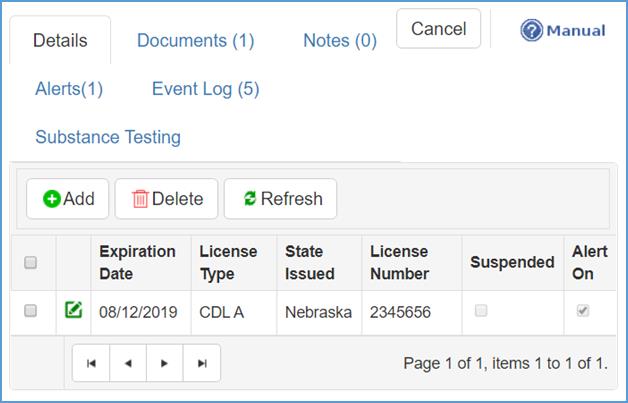
Once you have successfully made the changes you want to, click the Update button located at the bottom left-hand corner of your screen.
Uploading Licenses
The user has the ability to scan, upload and store license documentation. To upload documents into the system, refer to the following steps.
Step 1: Navigate to and click on the Documents tab which is next to the Details tab in the center of the screen.

The users screen should mirror the following screenshot.
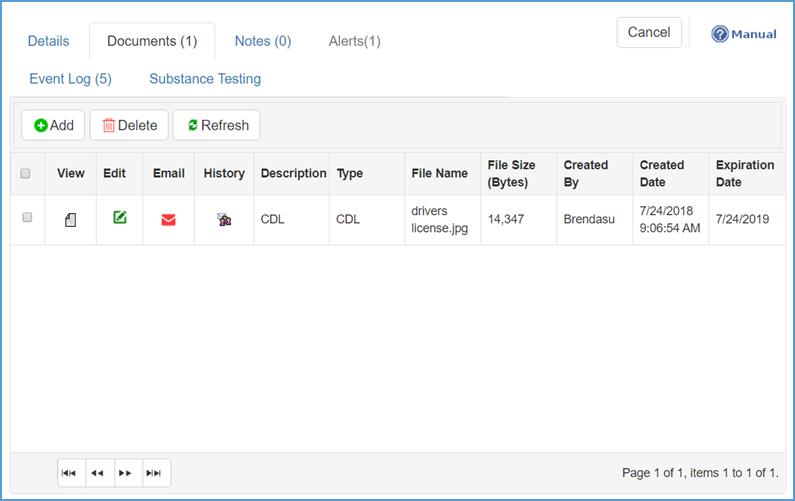
Step 2: Click the Add button on the left-hand side of the license documentation screen.
Once the File Upload screen has been brought up, select the: Document Category; The Expires In date for the document (if applicable, typically used for document retention requirements) or select Do Not Expire; Description; and the File Name.
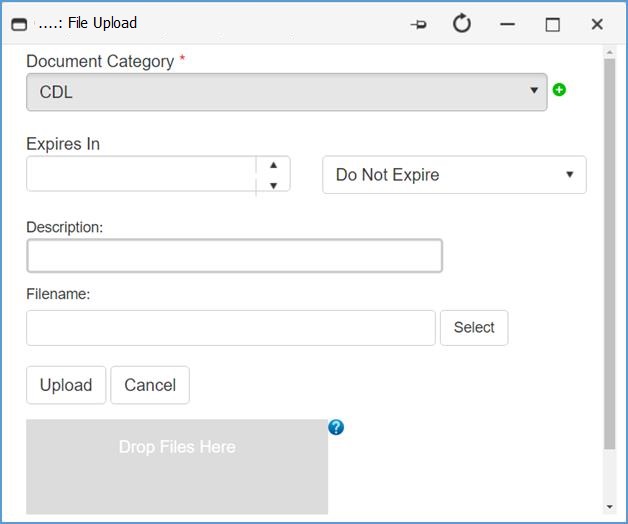
There are two (2) ways you can select a file to upload.
The first way is to click the Select button which is on the right hand side of the Filename field.

The second way is to click and drag the specific file you want to upload into the Drop Files Here field.
Step 3: Click the Upload button when complete.
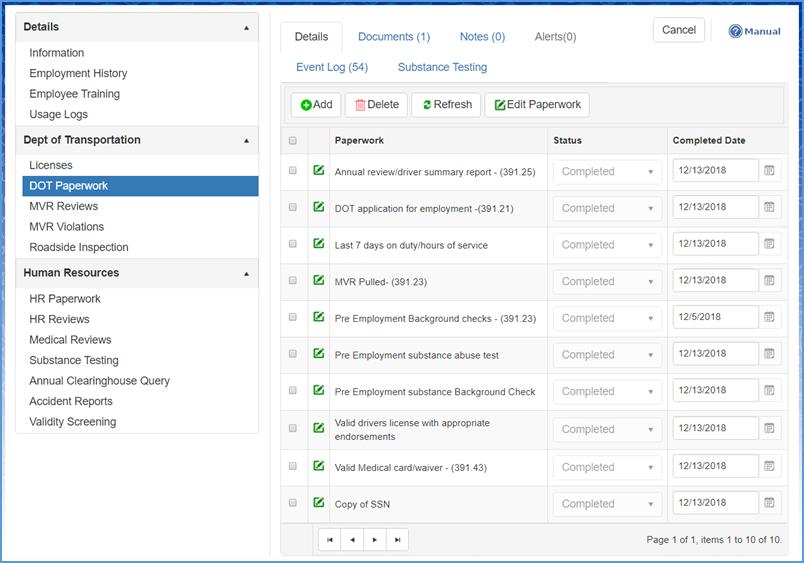
Personnel Management: Dept. of Transportation – DOT Paperwork
Under a specific employee, the Department of Transportation includes the following modules:
Licenses; DOT Paperwork; MVR Reviews; MVR Violations; and, Roadside Inspection.
DOT Paperwork allows the user to track all documentation required for employment, which can be uploaded and stored in the Craig Safety - Compliance Safety Manager™ system.
The Paperwork category list is prepopulated with required regulation sections for Federal Motor Carrier Safety Regulations (FMCSRs), however the user can add and/or delete items to meet their needs (state, county, etc.).
THIS SECTION IS UTILIZED AS A CHECKLIST FOR YOUR INITIAL DRIVER QUALIFICATION FILE. Reoccurring alerts are not set up here, they must be set up in their respective module.
Step 1: To add a new Paperwork category, click the Add button.
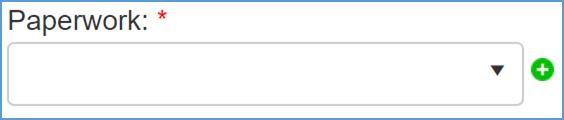
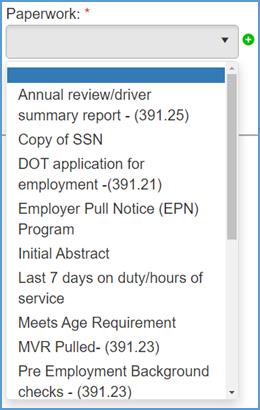
Step 2: Under the DOT Paperwork Detail section, navigate to the Paperwork field marked by a red asterisk (*).
Step 3: From the drop-down list, select the Paperwork category you want to add.
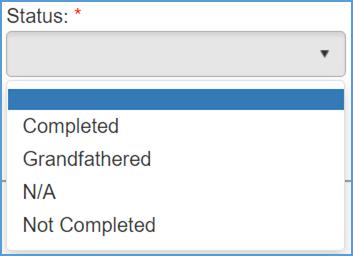
Step 4: Select the Status of the DOT paperwork which is marked by a red asterisk(*).
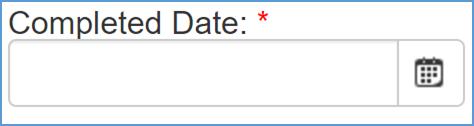
Step 5: Select the Completed Date.
Step 6: Click the Save button when complete.
Personnel Management: Dept. of Transportation – MVR Reviews
The MVR Reviews module covers Annual MVR Review (Certifications of Violations) and the MVR Pull. Specifically, it covers the alerts associated with these categories and how to set them up as well as importing the MVR Review documentation.
To add an MVR Review document for a specified employee, refer to the following steps:
Step 1: Navigate to the MVR Reviews module located under the Dept. of Transportation tab.
Step 2: Once in the MVR Reviews module, click on the Documents tab located at the top center of your screen.
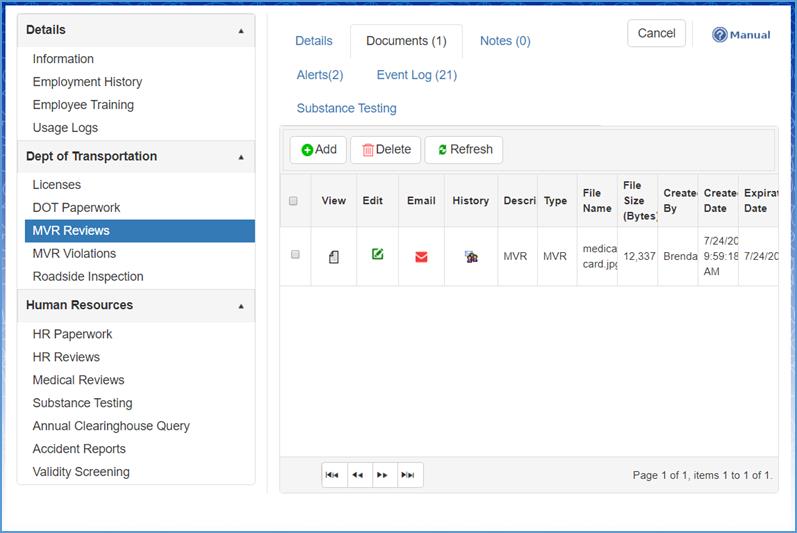
Step 3: Click the Add button which is displayed with a green plus sign.
When the MVR Review has been uploaded into the system, return back to the Details tab. The Details section of the MVR Reviews module is where you set up your alerts. Specifically, the alerts apply: Name of the review; Review Completed date; and, Next Review Due date.
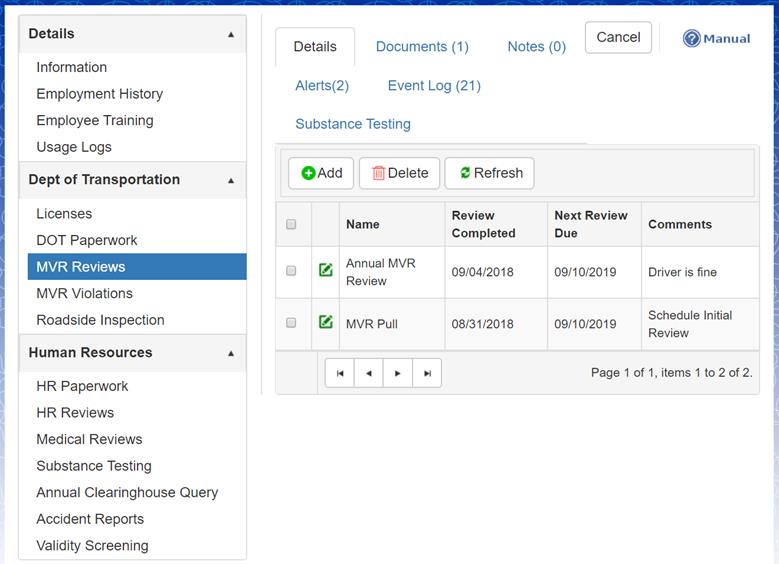
The MVR Pull alert pertains to a drivers annual MVR pull notice.
The Annual MVR Review alert pertains to after the MVR has been received and is reviewed by the employer.
To edit the alert, click the Edit icon one the left-hand side of the specified field.
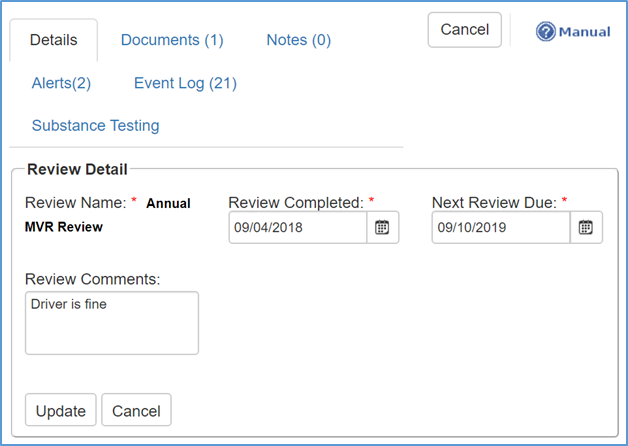
Fill out the required fields which are marked by red asterisks (*) and click the Update button when complete.
The MVR Pull alert is set to let the user know when the MVR needs to be ordered. This will be set as the same date as the Annual MVR Review date which acts as a secondary alert for the review of the MVR, once returned.
Pro Tip: Make sure to have the driver fill out and sign the Certification of Violations/Annual Review of Driving Record form prior to ordering MVR’s (this form can be found under Reports>Driver>MVR Certification Form)
To edit the MVR Pull alert, click the Edit icon located next to the specified field.

Fill out the required fields which are marked by red asterisks (*) and click the Update button when complete.
Personnel Management: Dept. of Transportation – MVR Violations
The purpose of the MVR Violations module is to store any violations issued to your organization’s drivers.
To add a new MVR Violations for a specified employee, click on the Add button which is indicated by a green plus sign.
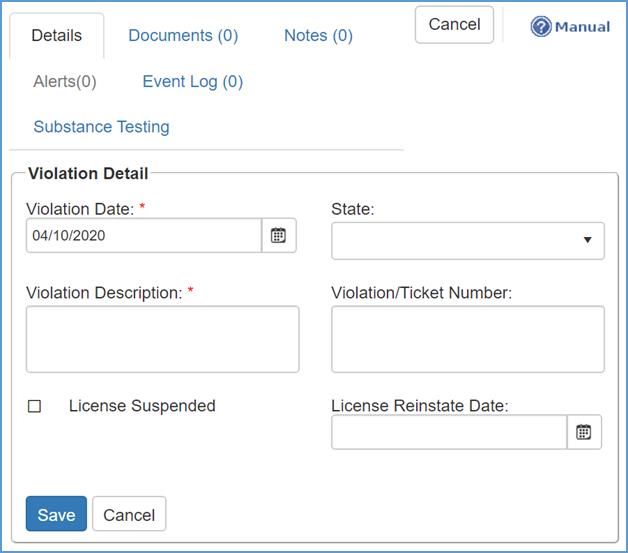
Enter your information into the required fields and click the Save button when complete.
Personnel Management: Dept. of Transportation – Roadside Inspection
To add a new record, click the Add button under the Details tab.
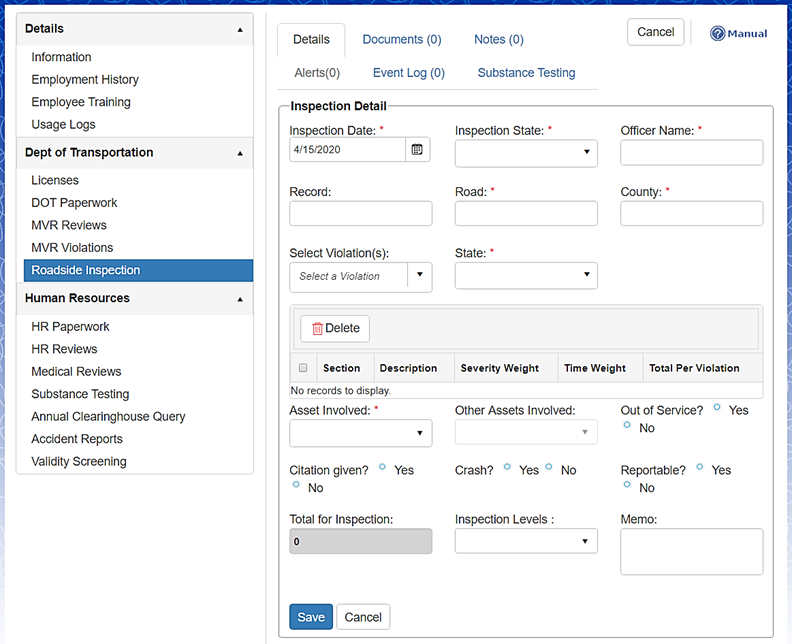
Under the Inspection Detail page, enter information pertaining specifically to the employee and required fields. Refer to the red asterisks (*).
Click the Save button at the bottom of the screen when complete.
Personnel Management: Human Resources – HR Paperwork
The HR Paperwork section enables the user to track all necessary paperwork they wish to track. Until the paperwork is completed, the system will continue sending alerts.
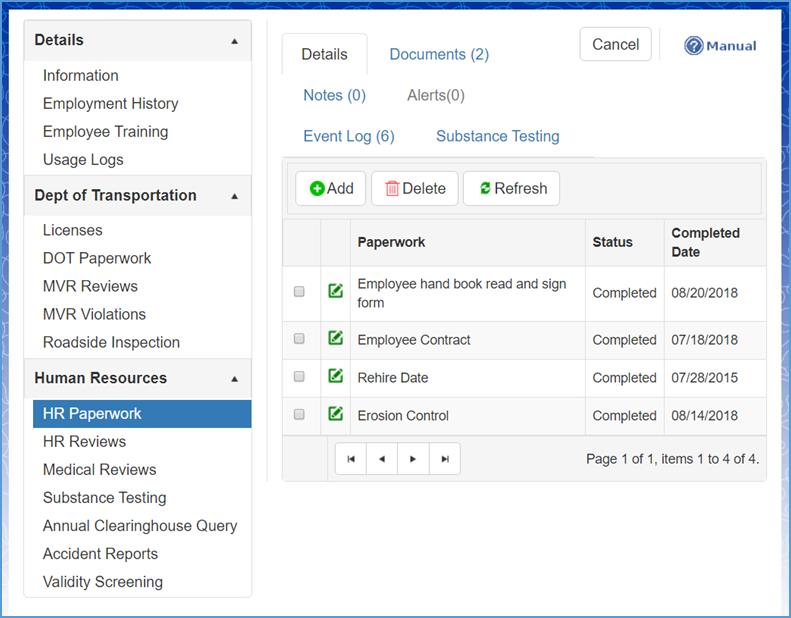
Step 1: To add new paperwork for a specific employee, click the Add button labeled by a green plus sign.
The drop-down menu for Type of paperwork contains the paperwork that is required for an employee, however the user has the ability to customize what is required for the specified employee.Click to see the Administration: Drop-Down Lists section for further instructions.
Step 2: Once the information is complete, click the Save button and the changes will be reflected in the system.
Each of the tabs under the Detail module allow the user to Add or Delete a selected record, and Refresh the system.

Personnel Management: Human Resources – HR Reviews
To add a new HR Review for a specified employee, click the Add button marked by a green plus sign.
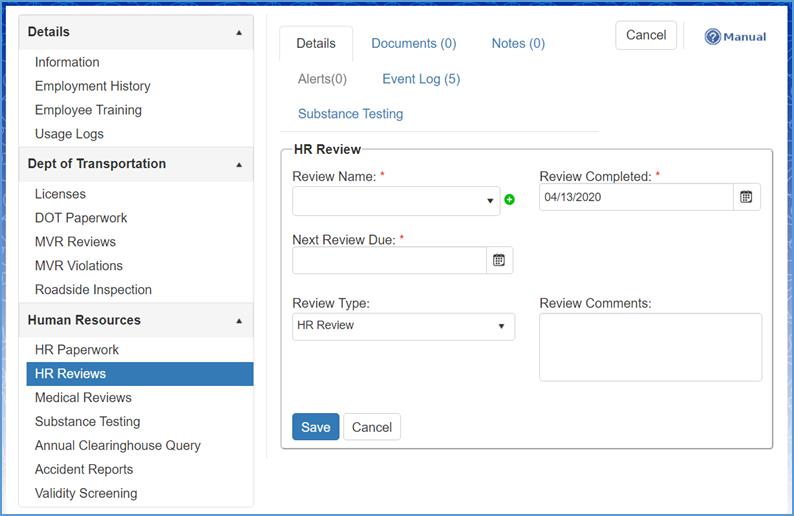
Once the information is entered in the required fields, click the Save button and the change(s) will be reflected in the system.
Personnel Management: Human Resources – Medical Reviews
The Medical Reviews module helps your organization keep track of medical certification required to keep your drivers in compliance.
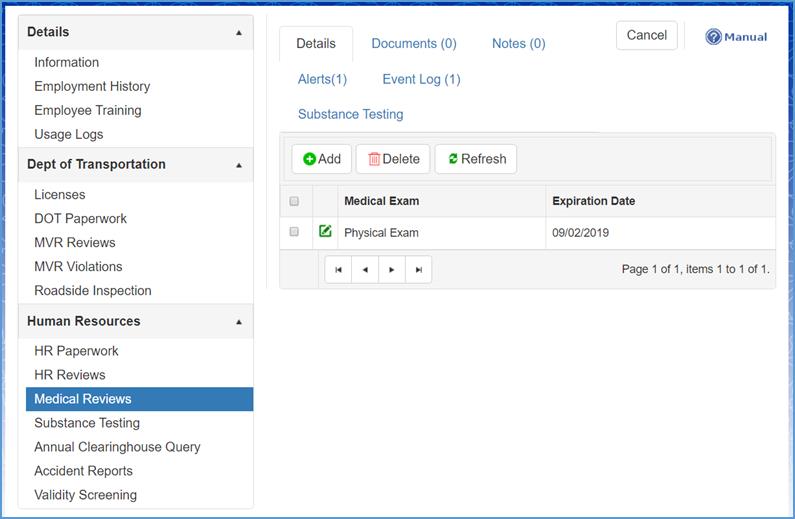
For example: The Department of Transportation (DOT) regulations require CDL Drivers take an annual physical. When the exam has been entered into the system, your organization will be alerted when the medical certification is expiring.
To add a new medical exam, press the Add button (it has a green plus sign next to it). To edit an existing exam, click the Edit icon. Refer to the following screenshot.
Implement the information needed into the required fields, and click the Save button when complete. If you are updating an existing record, make the changes you want and click the Update button when complete.
Pro Tip: Once a new medical certification is entered, be sure to look up and add proof of the Medical Examiners’ qualification in the National Registry of Medical Examiners on the FMCSA website:
https://www.fmcsa.dot.gov/national-registry-certified-medical-examiners-search
Personnel Management: Human Resources – Substance Testing
The Substance Testing module allows the user to enter all information on file for an alcohol and/or drug test(s). The results can be entered, scanned, and uploaded into the system. These fields will be auto populated and updated if the test is ordered through the eScreen integration.
To add a new substance test into the system, click the Add button under the Details tab. The following is a screenshot of the screen that will appear.
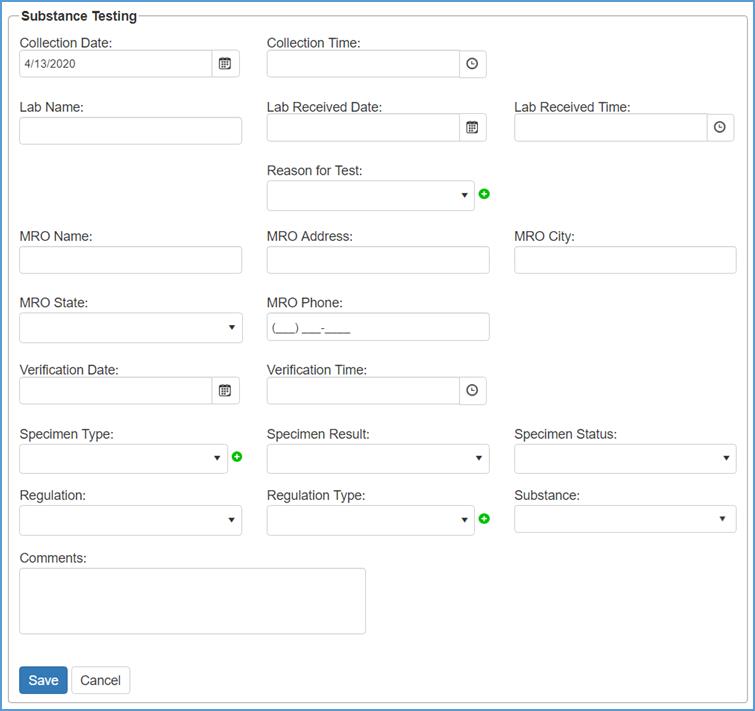
Once the information has been entered into the fields shown above, click the Save button and the results will be reflected on the Details homepage.
Note: The Administration program allows the user to set security roles and permissions for this module, resulting in limiting who has access to the drug/alcohol testing results. This feature assists the users in staying in compliance with HIPAA privacy rules.
Click here to access Administration: User Roles & Permissions for further instructions.
Personnel Management: Human Resources – Annual Clearinghouse Query
The FMCSA created an online database to track drug and alcohol program violations nationwide, including positive drug and/or alcohol test results and refusals. The database can be queried to find out if a CDL driver has any drug or alcohol violations that would impact their ability to perform safety-sensitive functions.
To add a new clearinghouse query into the system, click the Add button under the Details tab. The following is a screenshot of the screen that will appear.
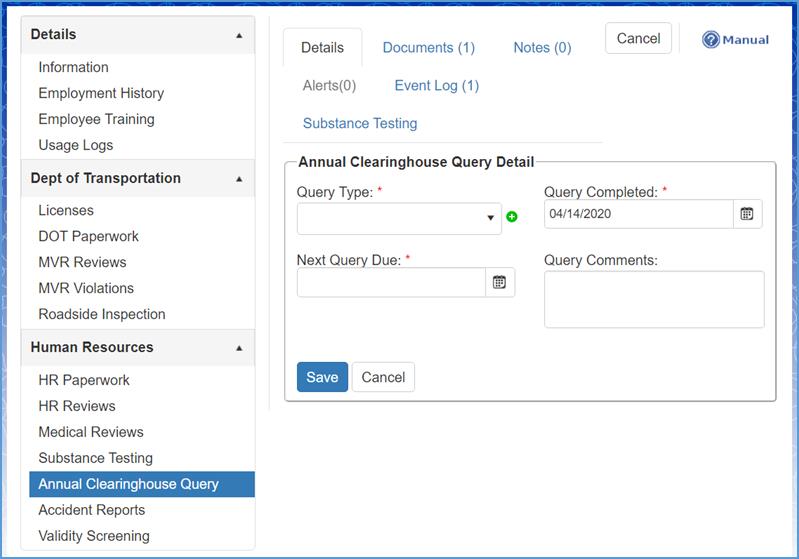
From the Query Type drop-down list, you have two options to choose from which is Full Query or Limited Query.
Note: Limited queries show all resolved or unresolved drug and alcohol program violations, but does not release any specific violation information. However, a full query allows the employer to see detailed records and information for any violations.
Once the information has been entered into the fields shown above, click the Save button and the results will be reflected on the Details page.
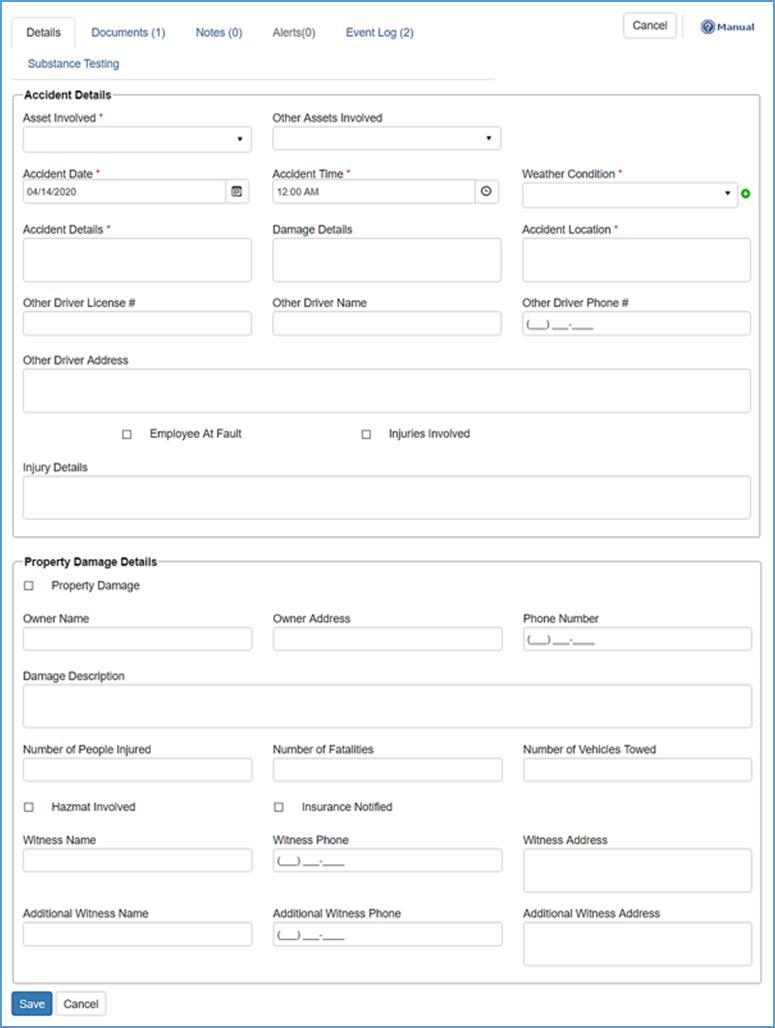
Personnel Management: Human Resources – Accident Reports
The Accident Reports module allows users to track all accident information.
Step 1: To begin the report of a new accident, click the Add button under the Details tab.
Step 2: Fill out all required fields (*) and click the Save button when complete.
Note: If you fill out the Asset Involved section, then the record will also show up in the specified asset’s Accident Reports module.
Personnel Management: Human Resources – Order Screening Solutions
Coming soon